# React Rudex
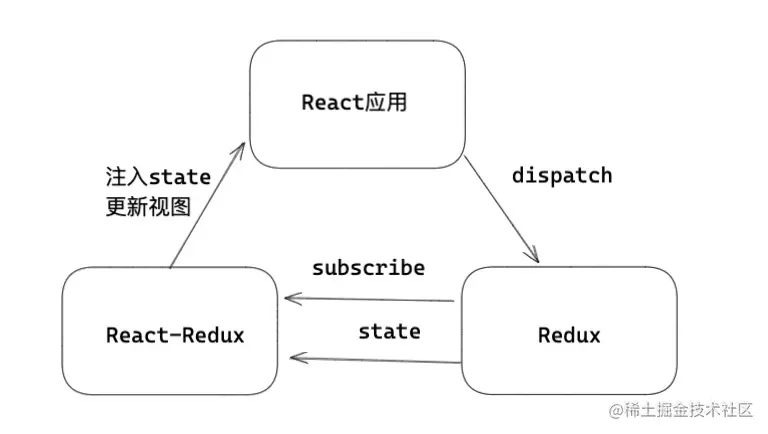
# 三者关系

# 设计思想
# 三大原则
- 单向数据流
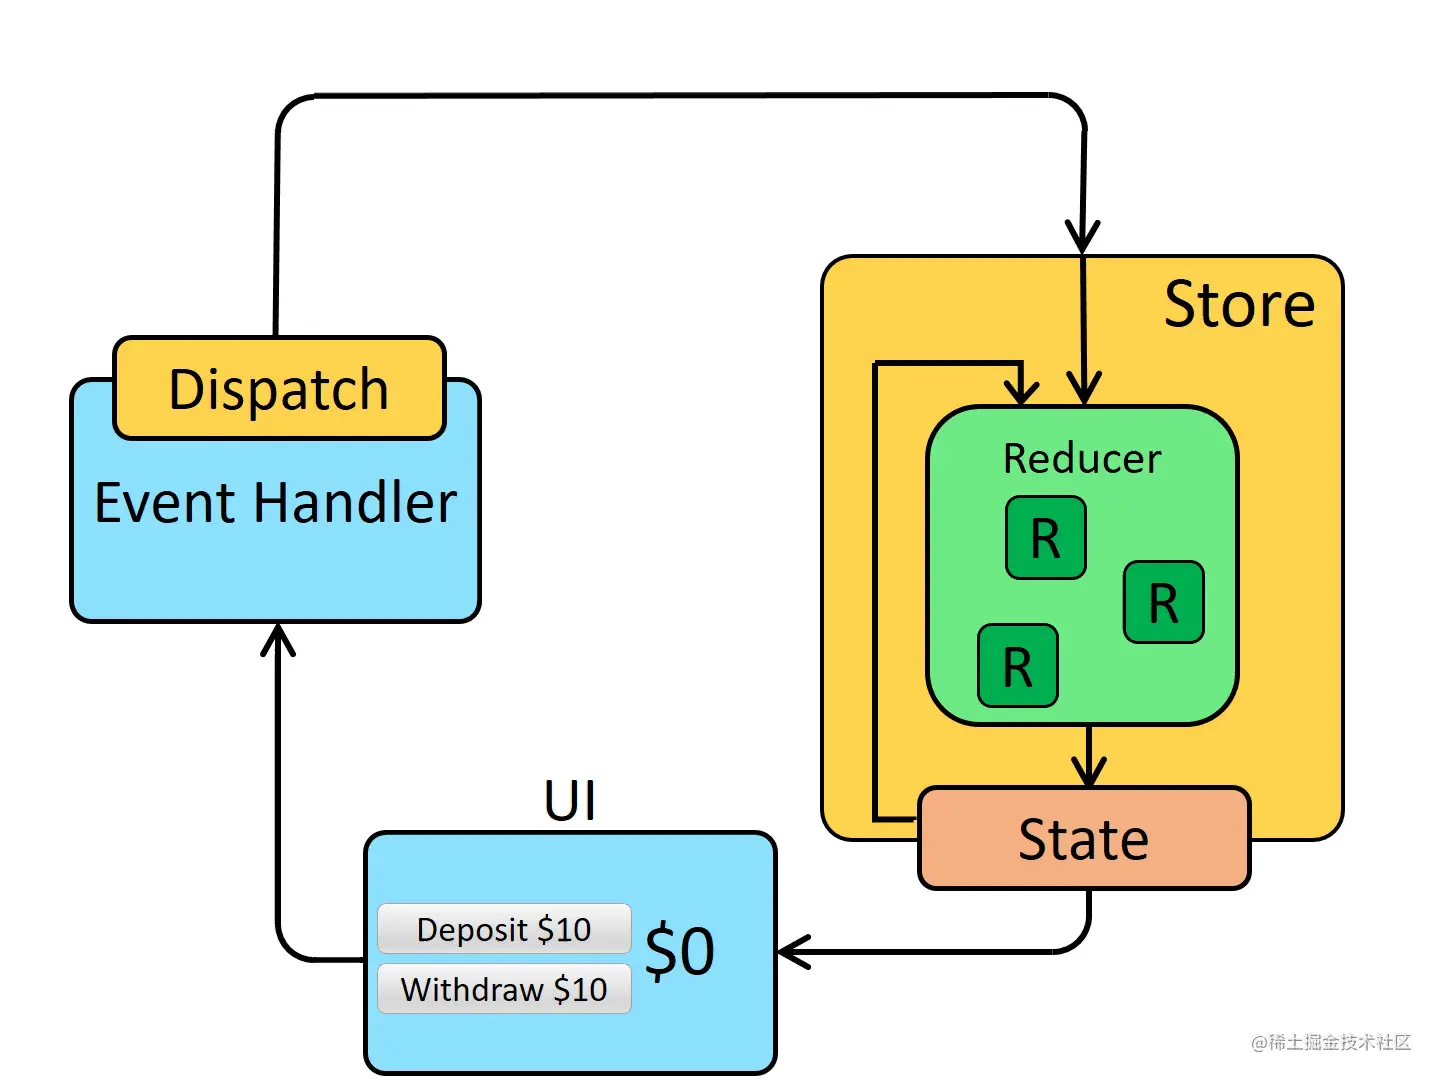
整个 redux ,数据流向都是单向的

- state 只读
在 Redux 中不能通过直接改变 state ,来让状态发生变化,如果想要改变 state ,那就必须触发一次 action ,通过 action 执行每个 reducer
- 纯函数执行
每一个 reducer 都是一个纯函数,里面不要执行任何副作用,返回的值作为新的 state ,state 改变会触发 store 中的 subscribe 。
# 发布订阅思想
redux 可以作为发布订阅模式的一个具体实现。redux 都会创建一个 store ,里面保存了状态信息,改变 store 的方法 dispatch ,以及订阅 store 变化的方法 subscribe 。
# 中间件思想
redux 应用了前端领域为数不多的中间件 compose ,那么 redux 的中间件是用来做什么的? 那就是强化 dispatch , Redux 提供了中间件机制,使用者可以根据需要来强化 dispatch 函数,传统的 dispatch 是不支持异步的,但是可以针对 Redux 做强化,于是有了 redux-thunk,redux-actions 等中间件,包括 dvajs 中,也写了一个 redux 支持 promise 的中间件。
# 核心 API
- createStore
- combineReducers
- applyMiddleware
# createStore
createStore redux 中通过 createStore 可以创建一个 Store ,使用者可以将这个 Store 保存传递给 React 应用
const Store = createStore(reducer, initialState, middleware)
- reducer : redux 的 reducer ,如果有多个那么可以调用 combineReducers 合并。
- initialState :初始化的 state 。
- middleware :如果有中间件,那么存放 redux 中间件。
模拟实现 createStore 核心:
function createStore(reducer, initialState) {
    // 初始化状态
    let state = initialState;
    // 存储订阅者(监听器)
    const listeners = [];

    // 获取当前状态
    function getState() {
        return state;
    }

    // 派发一个动作,触发状态更新(执行 reducer 和 通知状态的订阅者)
    function dispatch(action) {
        // 调用 reducer 更新状态
        state = reducer(state, action);
        // 通知所有订阅者
        listeners.forEach(listener => listener());
    }

    // 订阅状态
    function subscribe(listener) {
        // 添加订阅者
        listeners.push(listener);

        // 返回取消订阅的函数
        return () => {
            const index = listeners.indexOf(listener);
            if (index >= 0) {
                listeners.splice(index, 1);
            }
        };
    }

    // 派发一个初始化动作,设置初始状态
    dispatch({ type: '@@redux/INIT' });

    // 返回 store 对象
    return {
        getState,
        dispatch,
        subscribe
    };
}
2
3
4
5
6
7
8
9
10
11
12
13
14
15
16
17
18
19
20
21
22
23
24
25
26
27
28
29
30
31
32
33
34
35
36
37
38
39
40
41
42
43
# combineReducers
正常状态可以会有多个 reducer ,combineReducers 可以合并多个 reducer。
/* 将 number 和 PersonalInfo 两个 reducer 合并   */
const reducers = combineReducers({ number:numberReducer, info:InfoReducer })
2
模拟实现 combineReducers 核心:
// 合并多个 reducer 纯函数,返回合并后的 reducer
function combineReducers(reducers) {
    // 过滤掉非函数类型的 reducer
    const finalReducers = {};
    Object.keys(reducers).forEach(key => {
        if (typeof reducers[key] === 'function') {
            finalReducers[key] = reducers[key];
        }
    });

    // 获取所有 reducer 的键名
    const finalReducerKeys = Object.keys(finalReducers);

    /**
     * 根据动作更新状态。
     *
     * @param {Object} state - 当前状态。
     * @param {Object} action - 动作对象。
     * @returns {Object} - 新的状态。
     */
    return function combination(state = {}, action) {
        let hasChanged = false;
        const nextState = {};

        // 遍历每个 reducer 并更新状态
        for (let i = 0; i < finalReducerKeys.length; i++) {
            const key = finalReducerKeys[i];
            const reducer = finalReducers[key];
            const previousStateForKey = state[key];
            const nextStateForKey = reducer(previousStateForKey, action);

            nextState[key] = nextStateForKey;
            hasChanged = hasChanged || nextStateForKey !== previousStateForKey;
        }

        // 如果状态没有变化,返回原来的 state
        return hasChanged ? nextState : state;
    };
}
2
3
4
5
6
7
8
9
10
11
12
13
14
15
16
17
18
19
20
21
22
23
24
25
26
27
28
29
30
31
32
33
34
35
36
37
38
39
# applyMiddleware
applyMiddleware 高阶函数,用于注册中间件,支持多个参数,每一个参数都是一个中间件。每次触发 action ,中间件依次执行。
const middleware = applyMiddleware(logMiddleware)
模拟实现中间件注册函数:
// 将中间件函数数组 middlewares 注册到 store,返回强化后的 store 对象
function applyMiddleware(...middlewares) {
    return (createStore) => (reducer, initialState) => {
        // 创建原始 store
        const store = createStore(reducer, initialState);
        // 初始化 dispatch 函数
        let dispatch = () => {};

        // 创建中间件 API 对象
        const middlewareAPI = {
            getState: store.getState,
            dispatch: (action) => dispatch(action)
        };

        // 将中间件应用到 middlewareAPI
        const chain = middlewares.map(middleware => middleware(middlewareAPI));

        // 组合中间件
        dispatch = compose(...chain)(store.dispatch);

        // 返回增强后的 store
        return {
            ...store,
            dispatch
        };
    };
}

// 函数组合
function compose(...funcs) {
    if (funcs.length === 0) {
        return (arg) => arg;
    }
    if (funcs.length === 1) {
        return funcs[0];
    }
    return funcs.reduce((a, b) => (...args) => a(b(...args)));
}
2
3
4
5
6
7
8
9
10
11
12
13
14
15
16
17
18
19
20
21
22
23
24
25
26
27
28
29
30
31
32
33
34
35
36
37
38
测试用例:
// 定义一些简单的 reducers (纯函数)
const counterReducer = (state = { count: 0 }, action) => {
    switch (action.type) {
        case 'INCREMENT':
            return { ...state, count: state.count + 1 };
        case 'DECREMENT':
            return { ...state, count: state.count - 1 };
        default:
            return state;
    }
};

const userReducer = (state = { name: '' }, action) => {
    switch (action.type) {
        case 'SET_NAME':
            return { ...state, name: action.name };
        default:
            return state;
    }
};

// 组合 reducers  入参为 { key:value } reducers 映射对象
const rootReducer = combineReducers({
    counter: counterReducer,
    user: userReducer
});

// 创建 store
const store = createStore(rootReducer);

// 测试初始状态
console.log(store.getState()); // 应该输出 { counter: { count: 0 }, user: { name: '' } }

// 派发动作
store.dispatch({ type: 'INCREMENT' });
store.dispatch({ type: 'SET_NAME', name: 'John Doe' });

// 测试状态变化
console.log(store.getState()); // 应该输出 { counter: { count: 1 }, user: { name: 'John Doe' } }

// 测试中间件
const loggerMiddleware = (store) => (next) => (action) => {
    console.log('Dispatching:', action);
    const result = next(action);
    console.log('Next state:', store.getState());
    return result;
};

const middlewareEnhancedStore = createStore(
    rootReducer,
    applyMiddleware(loggerMiddleware)
);

middlewareEnhancedStore.dispatch({ type: 'INCREMENT' });
middlewareEnhancedStore.dispatch({ type: 'SET_NAME', name: 'Jane Doe' });
2
3
4
5
6
7
8
9
10
11
12
13
14
15
16
17
18
19
20
21
22
23
24
25
26
27
28
29
30
31
32
33
34
35
36
37
38
39
40
41
42
43
44
45
46
47
48
49
50
51
52
53
54
55
# Redux 基本用法
# 第一步:编写 reducer
/* number Reducer */
function numberReducer(state=1,action){
  switch (action.type){
    case 'ADD':
      return state + 1
    case 'DEL':
      return state - 1
    default:
      return state
  }
}
/* 用户信息reducer */
function InfoReducer(state={},action){
  const { payload = {} } = action
   switch (action.type){
     case 'SET':
       return {
         ...state,
         ...payload
       }
     default:
       return state
   }
}
2
3
4
5
6
7
8
9
10
11
12
13
14
15
16
17
18
19
20
21
22
23
24
# 第二步:注册中间件
redux 的中间件的编写方式,本质上应用了函数柯里化
/* 打印中间件 */
/* 第一层在 compose 中被执行 */
function logMiddleware(){
    /* 第二层在reduce中被执行 */
    return (next) => {
      /* 返回增强后的dispatch */
      return (action)=>{
        const { type } = action
        console.log('发生一次action:', type )
        return next(action)
      }
    }
}
2
3
4
5
6
7
8
9
10
11
12
13
# 第三步:生成Store
/* 注册中间件  */
const rootMiddleware = applyMiddleware(logMiddleware)
/* 注册reducer */
const rootReducer = combineReducers({ number:numberReducer,info:InfoReducer  })
/* 合成Store */
const Store = createStore(rootReducer,{ number:1 , info:{ name:null } } ,rootMiddleware)
2
3
4
5
6
# 第四步:试用 redux
在 useEffect 中进行订阅和解除订阅,通过 useState 改变视图层。store.getState 可以获取 redux 最新的 state 。
function Index(){
  const [ state , changeState  ] = useState(Store.getState())
  useEffect(()=>{
    /* 订阅state */
    const unSubscribe = Store.subscribe(()=>{
         changeState(Store.getState())
     })
    /* 解除订阅 */
     return () => unSubscribe()
  },[])
  return <div >
          <p>  { state.info.name ? `hello, my name is ${ state.info.name}` : 'what is your name' } ,
           { state.info.mes ? state.info.mes  : ' what do you say? '  } </p>
         《React进阶实践指南》 { state.number } 👍 <br/>
        <button onClick={()=>{ Store.dispatch({ type:'ADD' })  }} >点赞</button>
        <button onClick={()=>{ Store.dispatch({ type:'SET',payload:{ name:'alien' , mes:'let us learn React!'  } }) }} >修改标题</button>
     </div>
}
2
3
4
5
6
7
8
9
10
11
12
13
14
15
16
17
18
# React-Redux 基本用法
React-Redux 是沟通 React 和 Redux 的桥梁,它主要功能体现在如下两个方面:
- 接受 Redux 的 Store,并把它合理分配到所需要的组件中。
- 订阅 Store 中 state 的改变,促使消费对应的 state 的组件更新。
# Provider
由于 redux 数据层,可能被很多组件消费,所以 react-redux 中提供了一个 Provider 组件,可以全局注入 redux 中的 store ,所以使用者需要把 Provider 注册到根部组件中。Provider 作用就是保存 redux 中的 store ,分配给所有需要 state 的子孙组件。
# connect
既然已经全局注入了 Store ,那么需要 Store 中的状态或者想要改变 Store 的状态,那么如何处理呢,React-Redux 提供了一个高阶组件 connect,被 connect 包装后组件将获得如下功能:
- 能够从 props 中获取改变 state 的方法
Store.dispatch。 - 如果 connect 有第一个参数,那么会将 redux state 中的数据,映射到当前组件的 props 中,子组件可以使用消费。
- 当需要的 state ,有变化的时候,会通知当前组件更新,重新渲染视图。 开发者可以利用 connect 提供的功能,做数据获取,数据通信,状态派发等操作。首先来看看 connect 用法。
function connect(mapStateToProps?, mapDispatchToProps?, mergeProps?, options?)
# mapStateToProps
const mapStateToProps = state => ({ number: state.number })
组件依赖 redux 的 state,映射到业务组件的 props 中,state 改变触发,业务组件 props 改变,触发业务组件更新视图。当这个参数没有的时候,当前组件不会订阅 store 的改变。
# mapDispatchToProps
const mapDispatchToProps = dispatch => {
  return {
    numberAdd: () => dispatch({ type: 'ADD' }),
    setInfo: () => dispatch({ type: 'SET' }),
  }
}
2
3
4
5
6
将 redux 中的 dispatch 方法,映射到业务组件的 props 中。
# mergeProps
/*
* stateProps , state 映射到 props 中的内容
* dispatchProps, dispatch 映射到 props 中的内容。
* ownProps 组件本身的 props
*/
(stateProps, dispatchProps, ownProps) => Object

// 正常情况下,如果没有这个参数,会按照如下方式进行合并
{ ...ownProps, ...stateProps, ...dispatchProps }
2
3
4
5
6
7
8
9
# options
{
  context?: Object,   // 自定义上下文
  pure?: boolean, // 默认为 true , 当为 true 的时候 ,除了 mapStateToProps 和 props ,其他输入或者state 改变,均不会更新组件。
  areStatesEqual?: Function, // 当pure true , 比较引进store 中state值 是否和之前相等。 (next: Object, prev: Object) => boolean
  areOwnPropsEqual?: Function, // 当pure true , 比较 props 值, 是否和之前相等。 (next: Object, prev: Object) => boolean
  areStatePropsEqual?: Function, // 当pure true , 比较 mapStateToProps 后的值 是否和之前相等。  (next: Object, prev: Object) => boolean
  areMergedPropsEqual?: Function, // 当 pure 为 true 时, 比较 经过 mergeProps 合并后的值 , 是否与之前等  (next: Object, prev: Object) => boolean
  forwardRef?: boolean, //当为true 时候,可以通过ref 获取被connect包裹的组件实例。
}
2
3
4
5
6
7
8
9
# 实现组件通信
组件 A 通过 mapStateToProps,mapDispatchToProps,分别将state 中的 compBsay 属性,和改变 state 的 compAsay 方法,映射到 props 中。B 组件和 A 组件差不多,通过触发 dispatch 向组件 A 传递信息,同时接受 B 组件的信息。
// A 组件
function ComponentA({ toCompB, compBsay }) { /* 组件A */
  const [CompAsay, setCompAsay] = useState('')
  return <div className="box" >
    <p>我是组件A</p>
    <div> B组件对我说:{compBsay} </div>
        我对B组件说:<input placeholder="CompAsay" onChange={(e) => setCompAsay(e.target.value)} />
    <button onClick={() => toCompB(CompAsay)} >确定</button>
  </div>
}
/* 映射state中CompBsay  */
const CompAMapStateToProps = state => ({ compBsay: state.info.compBsay })
/* 映射toCompB方法到props中 */
const CompAmapDispatchToProps = dispatch => ({ toCompB: (mes) => dispatch({ type: 'SET', payload: { compAsay: mes } }) })
/* connect包装组件A */
export const CompA = connect(CompAMapStateToProps, CompAmapDispatchToProps)(ComponentA)

// 组件 B
class ComponentB extends React.Component { /* B组件 */
  state={ compBsay:'' }
  handleToA=()=>{
     this.props.dispatch({ type: 'SET', payload: { compBsay: this.state.compBsay } })
  }
  render() {
    return <div className="box" >
      <p>我是组件B</p>
      <div> A组件对我说:{ this.props.compAsay } </div>
       我对A组件说:<input placeholder="CompBsay" onChange={(e)=> this.setState({ compBsay: e.target.value  }) }  />
      <button  onClick={ this.handleToA } >确定</button>
    </div>
  }
}
/* 映射state中 CompAsay  */
const CompBMapStateToProps = state => ({ compAsay: state.info.compAsay })
export const CompB =  connect(CompBMapStateToProps)(ComponentB)
2
3
4
5
6
7
8
9
10
11
12
13
14
15
16
17
18
19
20
21
22
23
24
25
26
27
28
29
30
31
32
33
34
35
# 实现状态共享
通过在根组件中注入 store ,并在 useEffect 中改变 state 内容。然后在整个应用中在想要获取数据的组件里,获取 state 中的内容。通过 mapStateToProps 获取指定 state 中的内容,然后渲染视图。
export default function Root(){
  React.useEffect(()=>{
    Store.dispatch({ type:'ADD'})
    Store.dispatch({ type:'SET',payload:{ name:'alien' , mes:'let us learn React!'  } })
  },[])
  return <Provider store={Store} >
      <Index />
  </Provider>
}

import { connect } from 'react-redux'


class Index extends React.Component {
    componentDidMount() { }
    render() {
         const { info , number }:any = this.props
        return <div >
            <p>  {info.name ? `hello, my name is ${info.name}` : 'what is your name'} ,
          {info.mes ? info.mes : ' what do you say? '} </p>
        《React进阶实践指南》 {number} 👍 <br />
        </div>
    }
}

const mapStateToProps = state => ({ number: state.number, info: state.info })

export default connect(mapStateToProps)(Index)
2
3
4
5
6
7
8
9
10
11
12
13
14
15
16
17
18
19
20
21
22
23
24
25
26
27
28
# React-Redux 原理
# Provider 注入 Store
// react-redux/src/components/Provider.js
const ReactReduxContext = React.createContext(null)
function Provider({ store, context, children }) {
   /* 利用useMemo,跟据store变化创建出一个contextValue 包含一个根元素订阅器和当前store  */
  const contextValue = useMemo(() => {
      /* 创建了一个根级 Subscription 订阅器 */
    const subscription = new Subscription(store)
    return {
      store,
      subscription
    } /* store 改变创建新的contextValue */
  }, [store])

  useEffect(() => {
    const { subscription } = contextValue
    /* 触发trySubscribe方法执行,创建listens */
    subscription.trySubscribe() // 发起订阅
    return () => {
      subscription.tryUnsubscribe()  // 卸载订阅
    }
  }, [contextValue])  /*  contextValue state 改变出发新的 effect */

  const Context = ReactReduxContext
  return <Context.Provider value={contextValue}>{children}</Context.Provider>
}
2
3
4
5
6
7
8
9
10
11
12
13
14
15
16
17
18
19
20
21
22
23
24
25
- 首先知道
React-Redux是通过 context 上下文来保存传递 Store 的,但是上下文 value 保存的除了Store还有subscription。 subscription可以理解为订阅器,在React-redux中一方面用来订阅来自 state 变化,另一方面通知对应的组件更新。在 Provider 中的订阅器subscription为根订阅器,- 在 Provider 的
useEffect中,进行真正的绑定订阅功能,其原理内部调用了store.subscribe,只有根订阅器才会触发store.subscribe。
# Subscription 订阅器
/* 发布订阅者模式 */
export default class Subscription {
  constructor(store, parentSub) {
  //....
  }
  /* 负责检测是否该组件订阅,然后添加订阅者也就是listener */
  addNestedSub(listener) {
    this.trySubscribe()
    return this.listeners.subscribe(listener)
  }
  /* 向listeners发布通知 */
  notifyNestedSubs() {
    this.listeners.notify()
  }
  /* 开启订阅模式 首先判断当前订阅器有没有父级订阅器 , 如果有父级订阅器(就是父级Subscription),把自己的handleChangeWrapper放入到监听者链表中 */
  trySubscribe() {
    /*
    parentSub  即是provide value 里面的 Subscription 这里可以理解为 父级元素的 Subscription
    */
    if (!this.unsubscribe) {
      this.unsubscribe = this.parentSub
        ? this.parentSub.addNestedSub(this.handleChangeWrapper)
        /* provider的Subscription是不存在parentSub,所以此时trySubscribe 就会调用 store.subscribe   */
        : this.store.subscribe(this.handleChangeWrapper)
      this.listeners = createListenerCollection()
    }
  }
  /* 取消订阅 */
  tryUnsubscribe() {
     //....
  }
}
2
3
4
5
6
7
8
9
10
11
12
13
14
15
16
17
18
19
20
21
22
23
24
25
26
27
28
29
30
31
32
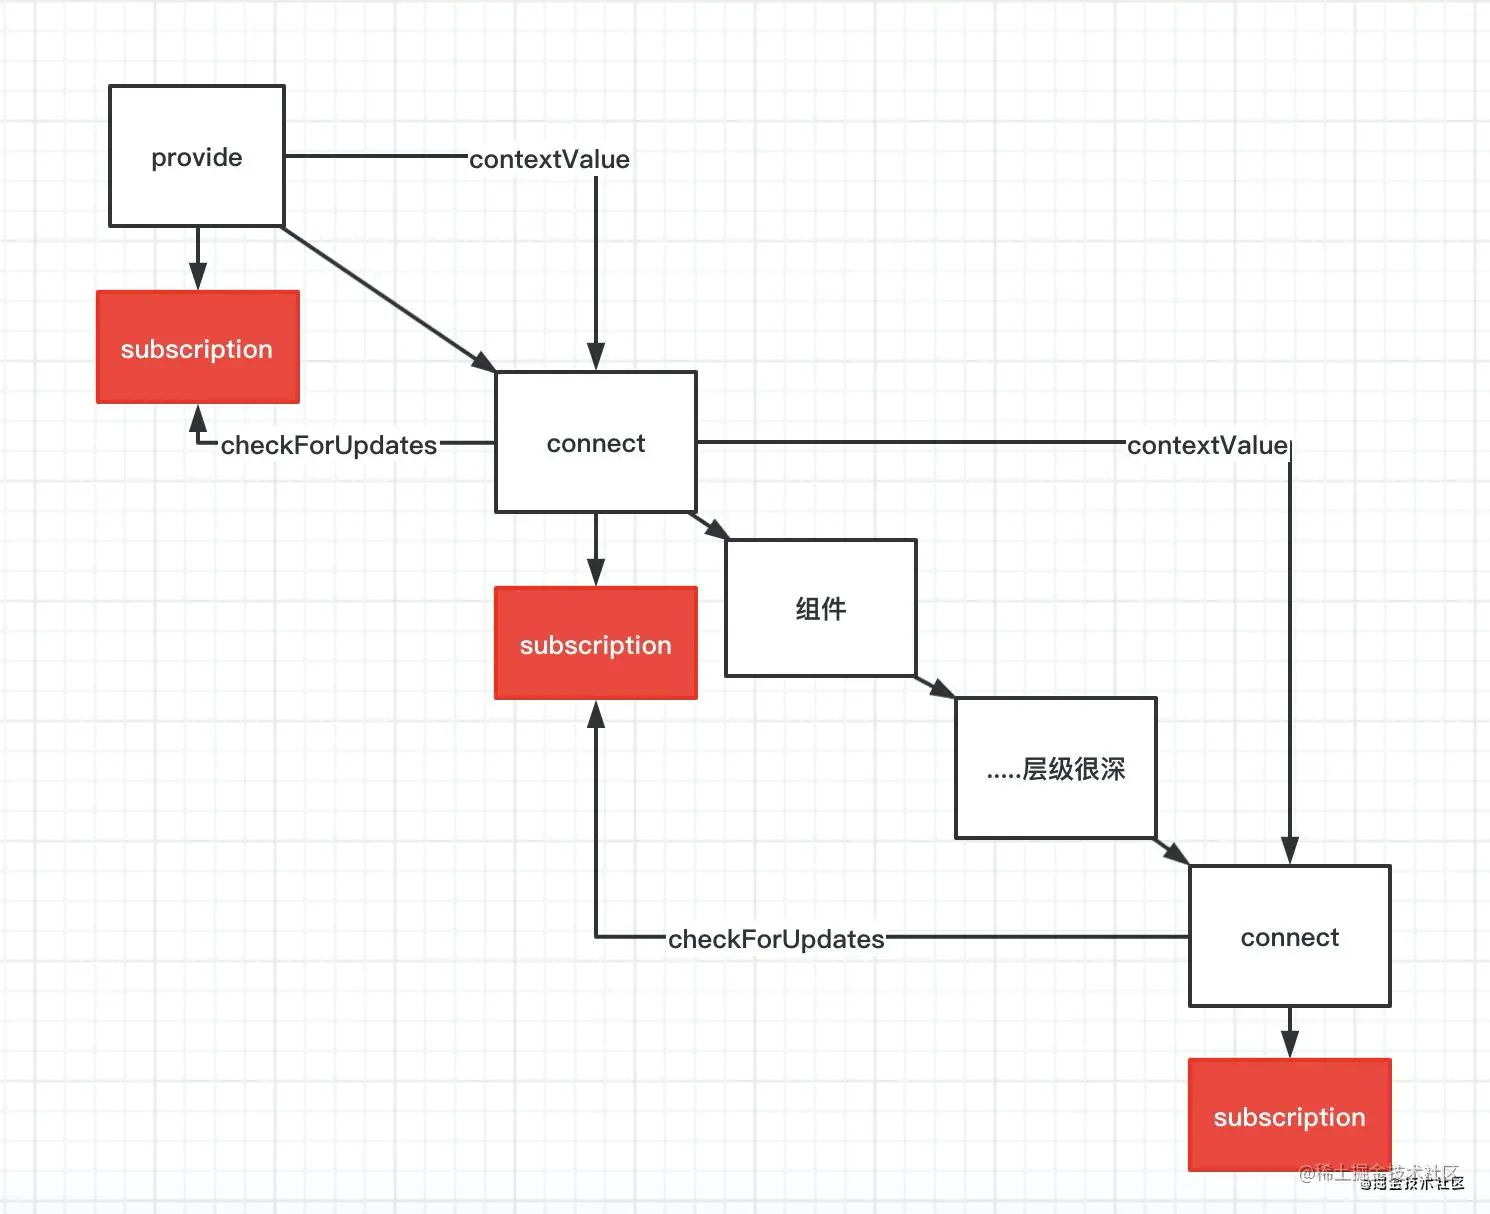
React-Redux 采用了层层订阅的思想,上述内容讲到 Provider 里面有一个 Subscription ,每一个用 connect 包装的组件,内部也有一个 Subscription ,而且这些订阅器一层层建立起关联,Provider中的订阅器是最根部的订阅器,可以通过 trySubscribe 和 addNestedSub 方法可以看到。还有一个注意的点就是,如果父组件是一个 connect ,子孙组件也有 connect ,那么父子 connect 的 Subscription 也会建立起父子关系。在调用 trySubscribe 的时候,能够看到订阅器会和上一级的订阅器通过 addNestedSub 建立起关联,当 store 中 state 发生改变,会触发 store.subscribe ,但是只会通知给 Provider 中的根Subscription,根 Subscription 也不会直接派发更新,而是会下发给子代订阅器( connect 中的 Subscription ),再由子代订阅器,决定是否更新组件,层层下发。
为什么 React-Redux 会采用 subscription 订阅器进行订阅,而不是直接采用 store.subscribe 呢 ?
- 首先 state 的改变,Provider 是不能直接下发更新的,如果下发更新,那么这个更新是整个应用层级上的,还有一点,如果需要 state 的组件,做一些性能优化的策略,那么该更新的组件不会被更新,不该更新的组件反而会更新了。
- 父 Subscription -> 子 Subscription 这种模式,可以逐层管理 connect 的状态派发,不会因为 state 的改变而导致更新的混乱。

# connect 原理
实现一个简易版的 connect 高阶函数助于理解其原理:
import React from 'react';
import { Component } from 'react';

/**
 * 将 Redux store 与 React 组件连接起来。
 *
 * @param {Function} [mapStateToProps] - 将 store 中的状态映射到组件的 props。
 * @param {Function} [mapDispatchToProps] - 将 dispatch 函数映射到组件的 props。
 * @returns {Function} - 返回一个高阶组件函数,用于包装原始组件。
 */
function connect(mapStateToProps = state => ({}), mapDispatchToProps = dispatch => ({ dispatch })) {
    return (WrappedComponent) => {
        class Connect extends Component {
            constructor(props) {
                super(props);
                this.state = {
                    store: null
                };
            }

            componentDidMount() {
                // 获取上下文中的 store
                this.setState({ store: this.context.store });

                // 订阅 store 的变化
                this.unsubscribe = this.context.store.subscribe(() => {
                    this.forceUpdate();
                });
            }

            componentWillUnmount() {
                // 取消订阅
                if (this.unsubscribe) {
                    this.unsubscribe();
                }
            }

            render() {
                const { store } = this.state;
                if (!store) {
                    return null;
                }

                // 获取当前状态
                const stateProps = mapStateToProps(store.getState(), this.props);

                // 获取 dispatch 函数
                const dispatchProps = mapDispatchToProps(store.dispatch, this.props);

                // 合并所有 props
                const finalProps = {
                    ...this.props,
                    ...stateProps,
                    ...dispatchProps
                };

                return <WrappedComponent {...finalProps} />;
            }
        }

        // 设置上下文类型,以便访问 store
        Connect.contextType = React.createContext().Context;

        return Connect;
    };
}

// 创建一个 React Context 以提供 store
const storeContext = React.createContext();

export { connect, storeContext };
2
3
4
5
6
7
8
9
10
11
12
13
14
15
16
17
18
19
20
21
22
23
24
25
26
27
28
29
30
31
32
33
34
35
36
37
38
39
40
41
42
43
44
45
46
47
48
49
50
51
52
53
54
55
56
57
58
59
60
61
62
63
64
65
66
67
68
69
70
71
使用
import React from 'react';
import { connect, storeContext } from './path/to/connect'; // 引入 connect 和 storeContext

// 定义 mapStateToProps
const mapStateToProps = (state) => ({
    count: state.count
});

// 定义 mapDispatchToProps
const mapDispatchToProps = (dispatch) => ({
    increment: () => dispatch({ type: 'INCREMENT' }),
    decrement: () => dispatch({ type: 'DECREMENT' })
});

// 使用 connect 将 Counter 组件与 store 连接起来
const ConnectedCounter = connect(mapStateToProps, mapDispatchToProps)(Counter);

// 渲染应用
function App() {
    return (
        <storeContext.Provider value={store}>
            <ConnectedCounter />
        </storeContext.Provider>
    );
}

export default App;
2
3
4
5
6
7
8
9
10
11
12
13
14
15
16
17
18
19
20
21
22
23
24
25
26
27
# connect 控制更新
// react-redux/src/components/connectAdvanced.js
// 返回的是一个 HOC
function connect(mapStateToProps, mapDispatchToProps){
    const Context = ReactReduxContext
    /* WrappedComponent 为connect 包裹的组件本身  */
    return function wrapWithConnect(WrappedComponent){
        function createChildSelector(store) {
          /* 选择器  合并函数 mergeprops */
          return selectorFactory(store.dispatch, { mapStateToProps,mapDispatchToProps })
        }

        /* 负责更新组件的容器 */
        function ConnectFunction(props){
          /* 获取 context内容 里面含有 redux中store 和父级subscription */
          const contextValue = useContext(ContextToUse)
          /* 创建子选择器,用于提取state中的状态和dispatch映射,合并到props中 */
          const childPropsSelector = createChildSelector(contextValue.store)
          const [subscription, notifyNestedSubs] = useMemo(() => {
            /* 创建一个子代Subscription,并和父级subscription建立起关系 */
            const subscription = new Subscription(
              store,
              didStoreComeFromProps ? null : contextValue.subscription // 父级subscription,通过这个和父级订阅器建立起关联。
            )
             return [subscription, subscription.notifyNestedSubs]
            }, [store, didStoreComeFromProps, contextValue])

            /* 合成的真正的props */
            const actualChildProps = childPropsSelector(store.getState(), wrapperProps)
            const lastChildProps = useRef()
            /* 更新函数 */
            const [ forceUpdate, ] = useState(0)
            useEffect(()=>{
                const checkForUpdates =()=>{
                   newChildProps = childPropsSelector()
                  if (newChildProps === lastChildProps.current) {
                      /* 订阅的state没有发生变化,那么该组件不需要更新,通知子代订阅器 */
                      notifyNestedSubs()
                  }else{
                     /* 这个才是真正的触发组件更新的函数 */
                     forceUpdate(state=>state+1)
                     lastChildProps.current = newChildProps /* 保存上一次的props */
                  }
                }
                subscription.onStateChange = checkForUpdates
                //开启订阅者 ,当前是被connect 包转的情况 会把 当前的 checkForceUpdate 放在存入 父元素的addNestedSub中 ,一点点向上级传递 最后传到 provide
                subscription.trySubscribe()
                /* 先检查一遍,反正初始化state就变了 */
                checkForUpdates()
            },[store, subscription, childPropsSelector])

             /* 利用 Provider 特性逐层传递新的 subscription */
            return  <ContextToUse.Provider value={{  ...contextValue, subscription}}>
                 <WrappedComponent  {...actualChildProps}  />
            </ContextToUse.Provider>
          }
          /* memo 优化处理 */
          const Connect = React.memo(ConnectFunction)
          return hoistStatics(Connect, WrappedComponent)  /* 继承静态属性 */
    }
}
2
3
4
5
6
7
8
9
10
11
12
13
14
15
16
17
18
19
20
21
22
23
24
25
26
27
28
29
30
31
32
33
34
35
36
37
38
39
40
41
42
43
44
45
46
47
48
49
50
51
52
53
54
55
56
57
58
59
60
connect 的逻辑还是比较复杂的,总结一下核心流程:
- connect 中有一个 selector 的概念,selector 有什么用?就是通过 mapStateToProps ,mapDispatchToProps ,把 redux 中 state 状态合并到 props 中,得到最新的 props 。
- 上述讲到过,每一个 connect 都会产生一个新的 Subscription ,和父级订阅器建立起关联,这样父级会触发子代的 Subscription 来实现逐层的状态派发。
- 有一点很重要,就是 Subscription 通知的是 checkForUpdates 函数,checkForUpdates 会形成新的 props ,与之前缓存的 props 进行浅比较,如果不想等,那么说明 state 已经变化了,直接触发一个useReducer 来更新组件,上述代码片段中,我用 useState 代替 useReducer 了,如果相等,那么当前组件不需要更新,直接通知子代 Subscription ,检查子代 Subscription 是否更新,完成整个流程。
