# React Router
# 三者关系
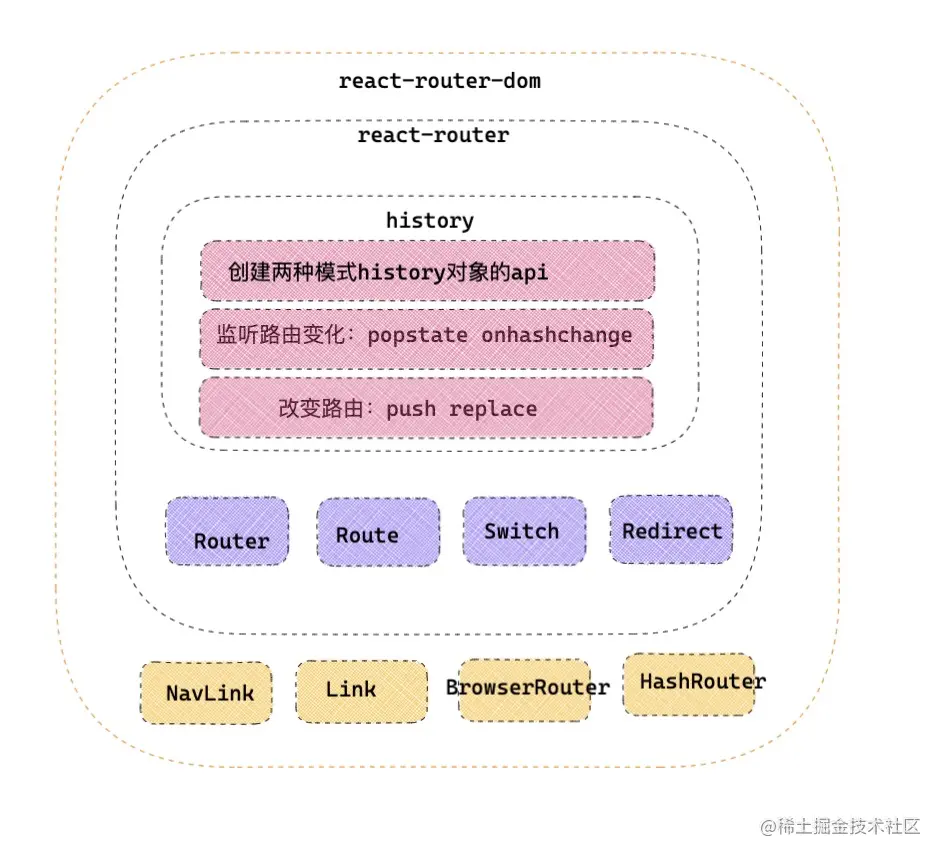
弄清楚 Router 原理之前,用一幅图表示 History ,React-Router , React-Router-Dom 三者的关系。

- history: history 是整个 React-router 的核心,里面包括两种路由模式下改变路由的方法,和监听路由变化方法等。
- react-router:既然有了 history 路由监听/改变的核心,那么需要调度组件负责派发这些路由的更新,也需要容器组件通过路由更新,来渲染视图。所以说 React-router 在 history 核心基础上,增加了 Router ,Switch ,Route 等组件来处理视图渲染。
- react-router-dom: 在 react-router 基础上,增加了一些 UI 层面的拓展比如 Link ,NavLink 。以及两种模式的根部路由 BrowserRouter ,HashRouter 。
# 路由原理
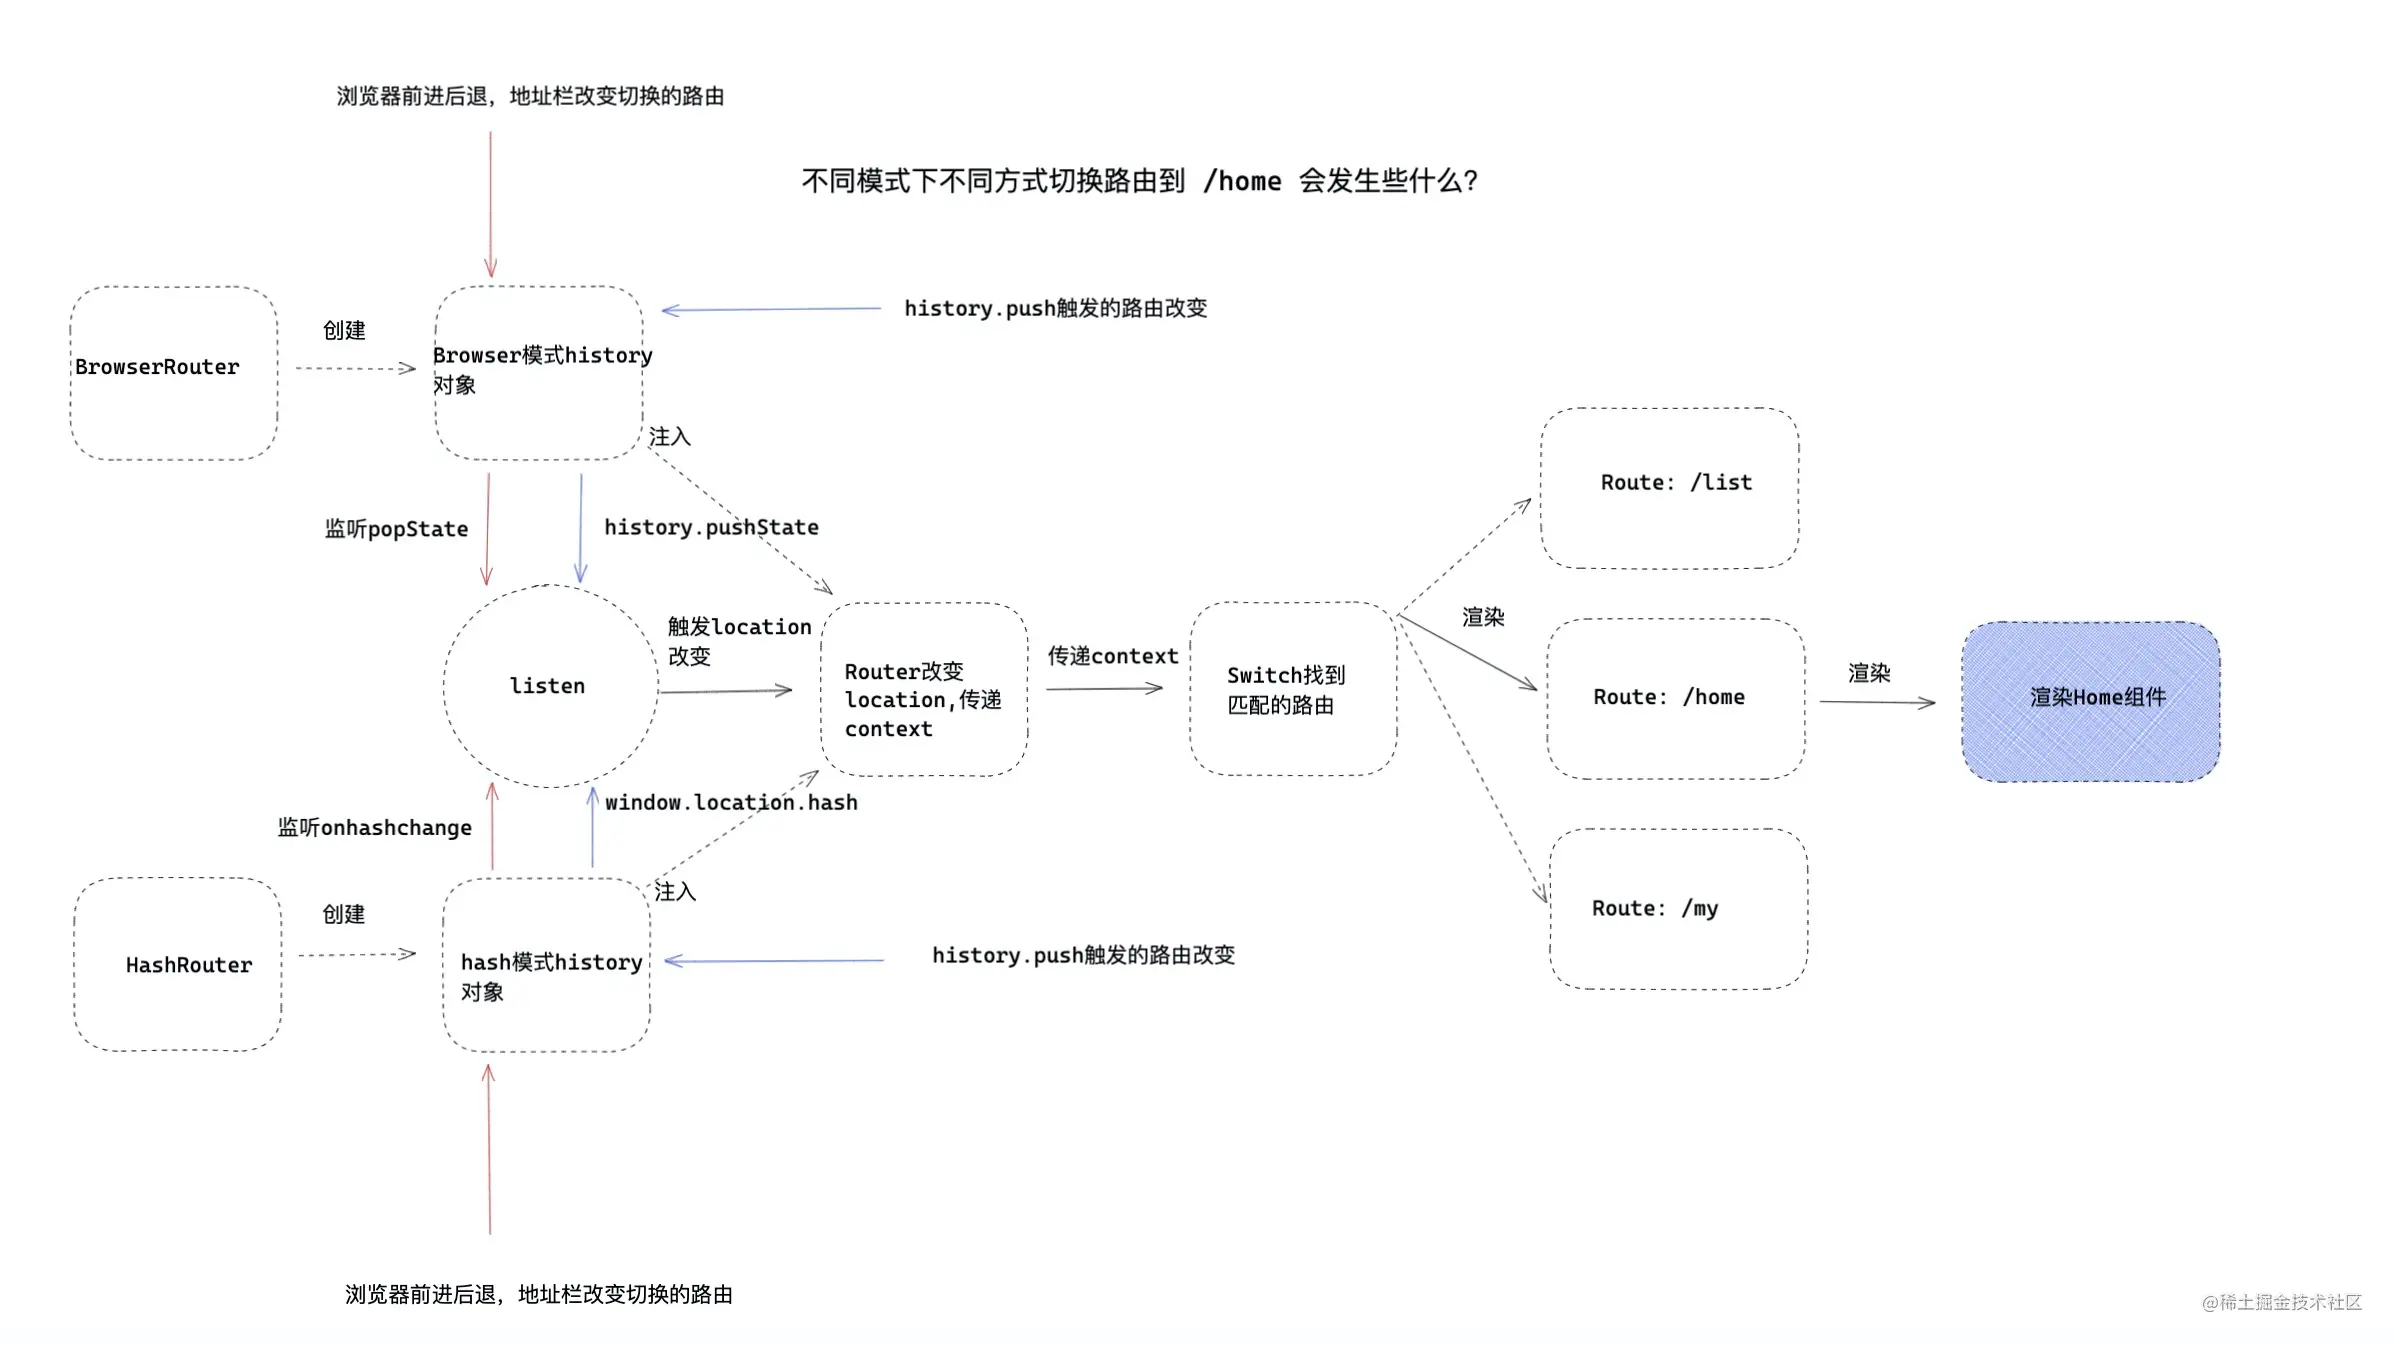
对于 BrowserRouter 或者是 HashRouter,实际上原理很简单,就是React-Router-dom 根据 history 提供的 createBrowserHistory 或者 createHashHistory 创建出不同的 history 对象。
# BrowserHistory 模式
创建路由:通过 createBrowserHistory 创建一个 history 对象,并传递给 Router 组件。
// react-router-dom/modules/BrowserRouter.js
import { createBrowserHistory as createHistory } from "history";
class BrowserRouter extends React.Component {
  history = createHistory(this.props)
  render() {
    return <Router history={this.history} children={this.props.children} />;
  }
}
2
3
4
5
6
7
8
改变路由:本质上是调用 window.history.pushState 和 window.history.replaceState 方法。
监听路由 popstate:同一个文档的 history 对象出现变化时,就会触发 popstate 事件。 history.pushState 可以使浏览器地址改变,但是无需刷新页面。注意的是:用 history.pushState() 或者 history.replaceState() 不会触发 popstate 事件。 popstate 事件只会在浏览器某些行为下触发, 比如点击后退、前进按钮或者调用 history.back()、history.forward()、history.go()方法。
# HashHistory 模式
改变路由 window.location.hash:通过 window.location.hash 属性获取和设置 hash 值。开发者在哈希路由模式下的应用中,切换路由,本质上是改变 window.location.hash 。
监听路由:hash 路由模式下,监听路由变化用的是 hashchange
# 路由组件
# Router
Router 是整个应用路由的传递者和派发更新者。 Router 作为一个传递路由和更新路由的容器,而 BrowserRouter 或 HashRouter 是不同模式下向容器 Router 中注入不同的 history 对象。
// react-router/modules/Router.js
class Router extends React.Component{
    constructor(props){
        super(props)
        this.state = {
           location: props.history.location
        }
        this.unlisten = props.history.listen((location)=>{ /* 当路由发生变化,派发更新 */
            this.setState({ location })
        })
    }
    /* .... */
    componentWillUnmount(){  if (this.unlisten) this.unlisten() }
    render(){
        return  <RouterContext.Provider
            children={this.props.children || null}
            value={{
                history: this.props.history,
                location: this.state.location,
                match: Router.computeRootMatch(this.state.location.pathname),
                staticContext: this.props.staticContext
            }}
        />
    }
}
2
3
4
5
6
7
8
9
10
11
12
13
14
15
16
17
18
19
20
21
22
23
24
25
- 首先 React-Router 是通过 context 上下文方式传递的路由信息。在 context 章节讲过,context 改变,会使消费 context 组件更新,这就能合理解释了,当开发者触发路由改变,为什么能够重新渲染匹配组件。
- props.history 是通过 BrowserRouter 或 HashRouter 创建的history 对象,并传递过来的,当路由改变,会触发 listen 方法,传递新生成的 location ,然后通过 setState 来改变 context 中的 value ,所以改变路由,本质上是 location 改变带来的更新作用。
# Route
Route 是整个路由核心部分,它的工作主要就是一个: 匹配路由,路由匹配,渲染组件。 由于整个路由状态是用 context 传递的,所以 Route 可以通过 RouterContext.Consumer 来获取上一级传递来的路由进行路由匹配,如果匹配,渲染子代路由。并利用 context 逐层传递的特点,将自己的路由信息,向子代路由传递下去。这样也就能轻松实现了嵌套路由。
function Index(){
    const mes = { name:'alien',say:'let us learn React!' }
    return <div>
        <Meuns/>
        <Switch>
            <Route path='/router/component'   component={RouteComponent}   /> { /* Route Component形式 */ }
            <Route path='/router/render'  render={(props)=> <RouterRender { ...props }  /> }  {...mes}  /> { /* Render形式 */ }
            <Route path='/router/children'  > { /* chilren形式 */ }
                <RouterChildren  {...mes} />
            </Route>
            <Route path="/router/renderProps"  >
                { (props)=> <RouterRenderProps {...props} {...mes}  /> }  {/* renderProps形式 */}
            </Route>
        </Switch>
    </div>
}
export default Index
2
3
4
5
6
7
8
9
10
11
12
13
14
15
16
17
四种 Route 编写格式:
- Component 形式:将组件直接传递给 Route 的 component 属性,Route 可以将路由信息隐式注入到页面组件的 props 中,但是无法传递父组件中的信息,比如如上 mes 。
- render 形式:Route 组件的 render 属性,可以接受一个渲染函数,函数参数就是路由信息,可以传递给页面组件,还可以混入父组件信息。
- children 形式:直接作为 children 属性来渲染子组件,但是这样无法直接向子组件传递路由信息,但是可以混入父组件信息。
- renderProps 形式:可以将 childen 作为渲染函数执行,可以传递路由信息,也可以传递父组件信息。
Route 可以加上 exact ,来进行精确匹配,精确匹配原则,pathname 必须和 Route 的 path 完全匹配,才能展示该路由信息。所以如果是嵌套路由的父路由,千万不要加 exact=true 属性。换句话只要当前路由下有嵌套子路由,就不要加 exact 。
# Switch
Switch Switch 作用就是匹配唯一正确的路由并渲染。每个页面路由展示与否,是通过 Route 内部 location 信息匹配的。
# Redirect
假设有下面两种情况:
当如果修改地址栏或者调用 api 跳转路由的时候,当找不到匹配的路由的时候,并且还不想让页面空白,那么需要重定向一个页面。
当页面跳转到一个无权限的页面,期望不能展示空白页面,需要重定向跳转到一个无权限页面。
这时候就需要重定向组件 Redirect ,Redirect 可以在路由不匹配情况下跳转指定某一路由,适合路由不匹配或权限路由的情况。
注意
Switch 包裹的 Redirect 要放在最下面,否则会被 Switch 优先渲染 Redirect ,导致路由页面无法展示。
# 跳转流程图

# 使用指南
# 路由状态获取
对于路由状态获取,首先如果想要在一些子页面中获取 history 或者 location ,实现路由匹配或者路由跳转。
# 1. 路由组件 props
被 Route 包裹的路由组件 props 中会默认混入 history 等信息,那么如果路由组件的子组件也想共享路由状态信息和改变路由的方法,那么 props 可以是一个很好的选择。
# 2. withRouter
对于距离路由组件比较远的深层次组件,通常可以用 react-router 提供的 withRouter 高阶组件方式获取 histroy ,loaction 等信息。
import { withRouter } from 'react-router-dom'
@withRouter
class Home extends React.Component{
    componentDidMount(){
        console.log(this.props.history)
    }
    render(){
        return <div>
            { /* ....*/ }
        </div>
    }
}
2
3
4
5
6
7
8
9
10
11
12
# 3. useHistory 和 useLocation
对于函数组件,可以用 React-router 提供的自定义 hooks 中的 useHistory 获取 history 对象,用 useLocation 获取 location 对象。
import { useHistory ,useLocation  } from 'react-router-dom'
function Home(){
    const history = useHistory() /* 获取history信息 */
    const useLocation = useLocation() /* 获取location信息 */
}
2
3
4
5
注意
无论是 withRouter ,还是 hooks ,都是从保存的上下文中获取的路由信息,所以要保证想要获取路由信息的页面,都在根部 Router 内部。
# 路由带参数跳转
关于路由跳转有声明式路由和函数式路由两种。
- 声明式:
<NavLink to='/home' />,利用 react-router-dom 里面的Link或者NavLink。 - 函数式:
histor.push('/home')。
有的时候页面间需要传递信息。这里介绍几种传递参数的方式:
# 1. url 拼接
const name = 'alien'
const mes = 'let us learn React!'
history.push(`/home?name=${name}&mes=${mes}`)
2
3
这种方式通过 url 拼接,比如想要传递的参数,会直接暴露在 url 上,而且需要对 url 参数,进行解析处理,实际开发中我不推荐这种方式,我更推荐下面的方式。
# 2. state 路由状态
const name = 'alien'
const mes = 'let us learn React!'
history.push({
    pathname:'/home',
    state:{
        name,
        mes
    }
})

const {state = {}} = this.prop.location
const { name , mes } = state
2
3
4
5
6
7
8
9
10
11
12
# 动态路径参数路由
<Route path="/post/:id"  />

history.push('/post/'+id) // id为动态的文章id
2
3
# mini-router
整个 mini-Router 还是采用 history 库,也就是 mini-Router 需要完成的是 React-Router 和 React-Router-DOM 核心部分。实现的具体功能如下:
- 组件层面: 在组件层面,需要实现提供路由状态的 Router ,控制渲染的 Route ,匹配唯一路由的 Switch 。
- api层面: 提供获取 history 对象的 useHistory 方法,获取 location 对象的 useLocation 方法。
- 高阶组件层面: 对于不是路由的页面,提供 withRouter,能够获取当前路由状态。
- 额外功能: 之前有很多同学问过我,在 React 应用中,可不可以提供有方法监听路由改变,所以 mini-Router 需要做的是增加路由监听器,当路由改变,触发路由监听器。
# 组件层面
# 提供路由更新派发——Router
import React ,{ useCallback, useState , useEffect ,createContext, useMemo  } from 'react'
import { createBrowserHistory as createHistory  } from 'history'

export const RouterContext = createContext()
export let rootHistory = null

export default function Router(props){
     /* 缓存history属性 */
     const history = useMemo(() => {
          rootHistory = createHistory()
          return rootHistory
     },[])
     const [ location, setLocation ] = useState(history.location)
     useEffect(()=>{
          /* 监听location变化,通知更新 */
          const unlisten = history.listen((location)=>{
               setLocation(location)
          })
          return function () {
               unlisten && unlisten()
          }
     },[])
     return <RouterContext.Provider
         value={{
               location,
               history,
               match: { path: '/', url: '/', params: {}, isExact: location.pathname === '/' }
          }}
            >
          {props.children}
     </RouterContext.Provider>
}
2
3
4
5
6
7
8
9
10
11
12
13
14
15
16
17
18
19
20
21
22
23
24
25
26
27
28
29
30
31
32
Router 设计思路:
- 创建一个 React Context ,用于保存路由状态。用 Provider 传递 context 。
- 用一个 useMemo 来缓存 BrowserHistory 模式下的产生的路由对象 history ,这里有一个小细节,就是产生 history 的同时,把它赋值给了一个全局变量 rootHistory ,为什么这么做呢,答案一会将揭晓。
- 通过 useEffect 进行真正的路由监听,当路由改变,通过 useState ,改变 location 对象,会改变 Provider 里面 value 的内容,通知消费 context 的 Route ,Switch 等组件更新。 useEffect 的 destory 用于解绑路由监听器。
# 控制更新——Route
import React , { useContext } from 'react'
import { matchPath } from 'react-router'
import { RouterContext } from './Router'

function  Route(props) {
    const context = useContext(RouterContext)
    /* 获取location对象 */
    const location = props.location || context.location
    /* 是否匹配当前路由,如果父级有switch,就会传入computedMatch来精确匹配渲染此路由 */
    const match = props.computedMatch ? props.computedMatch
                 : props.path ?  matchPath(location.pathname,props) : context.match
     /* 这个props用于传递给路由组件 */
    const newRouterProps = { ...context, location, match  }
    let { children, component, render  } = props
    if(Array.isArray(children) && children.length ===0 ) children = null
    let renderChildren = null
    if(newRouterProps.match){
        if(children){
            /* 当Router 是 props children 或者 render props 形式。*/
            renderChildren =  typeof children === 'function' ? children(newRouterProps) : children
        }else if(component){
            /*  Route有component属性 */
            renderChildren = React.createElement(component, newRouterProps)
        }else if(render){
            /*  Route有render属性 */
            renderChildren = render(newRouterProps)
        }
    }
    /* 逐层传递上下文 */
    return <RouterContext.Provider  value={newRouterProps}  >
        {renderChildren}
    </RouterContext.Provider>
}
export default Route
2
3
4
5
6
7
8
9
10
11
12
13
14
15
16
17
18
19
20
21
22
23
24
25
26
27
28
29
30
31
32
33
34
- 用 useContext 提取出路由上下文,当路由状态 location 改变,因为消费context 的组件都会重新渲染,当前Route会组件重新渲染,通过当前的 location 的 pathname 进行匹配,判断当前组件是否渲染,因为 Route 子组件有四种形式,所以会优先进行判断。
- 为了让 Route 的子组件访问到当前 Route 的信息,所以要选择通过 Provider 逐层传递的特点,再一次传递当前 Route 的信息,这样也能够让嵌套路由更简单的实现。
- 因为如果父级元素是 Switch ,就不需要匹配路由了,因为这些都是 Switch 该干的活,所以用 computedMatch 来识别是否上一层的 Switch 已经匹配完成了。
# 匹配正确路由—— Switch
import React, { useContext } from 'react'
import { matchPath } from 'react-router'

import { RouterContext } from '../component/Router'

export default function Switch(props){
    const context = useContext(RouterContext)
    const location = props.location || context.location
    let children , match
    /* 遍历children Route 找到匹配的那一个 */
    React.Children.forEach(props.children,child=>{
        if(!match && React.isValidElement(child) ){ /* 路由匹配并为React.element元素的时候 */
           const path = child.props.path //获取Route上的path
           children = child /* 匹配的children */
           match = path ? matchPath(location.pathname,{ ...child.props }) : context.match /* 计算是否匹配 */
        }
    })
    /* 克隆一份Children,混入 computedMatch 并渲染。 */
    return  match ? React.cloneElement(children, { location, computedMatch: match }) : null
}
2
3
4
5
6
7
8
9
10
11
12
13
14
15
16
17
18
19
20
- Switch 也要订阅来自 context 的变化,然后对 children 元素,进行唯一性的路由匹配。
- 通过
React.Children.forEach遍历子 Route,然后通过 matchPath 进行匹配,如果匹配到组件,将克隆组件,混入 computedMatch,location 等信息。
# hooksAPI 层面
为了让 mini-Router 每一个组件都能自由获取路由状态,这里编写了两个自定义 hooks。
# 获取 history 对象
import { useContext } from 'react'
import { RouterContext  } from '../component/Router'
/* 用useContext获取上下文中的history对象 */
export default function useHistory() {
    return useContext(RouterContext).history
}
2
3
4
5
6
- 用 useContext 获取上下文中的 history 对象。
# 获取 location 对象
import { useContext } from 'react'
import { RouterContext  } from '../component/Router'
/* 用useContext获取上下文中的location对象 */
export default function  useLocation() {
    return useContext(RouterContext).location
}
2
3
4
5
6
- 用 useContext 获取上下文中的 location 对象。
上述的两个 hooks 编写起来非常简单,但是也要注意一个问题,两个 hooks 本质上都是消费了 context ,所以用到上述两个 hook 的组件,当context 变化,都会重新渲染。接下来增加一个新的功能,监听路由改变。
# 监听路由改变
和上面两种情况不同,不想订阅 context 变化,而带来的更新作用,另外一点就是这种监听有可能在 Router 包裹的组件层级之外,那么如何达到目的呢?这个时候在 Router 中的 rootHistory 就派上了用场,这个 rootHistory 目的就是为了全局能够便捷的获取 history 对象。接下来具体实现一个监听路由变化的自定义 hooks 。
import { useEffect } from 'react'
import { rootHistory } from '../component/Router'

/* 监听路由改变 */
function useListen(cb) {
    useEffect(()=>{
        if(!rootHistory) return ()=> {}
        /* 绑定路由事件监听器 */
        const unlisten = rootHistory.listen((location)=>{
             cb && cb(location)
        })
        return function () {
            unlisten && unlisten()
        }
    },[])
}
export default useListen
2
3
4
5
6
7
8
9
10
11
12
13
14
15
16
17
- 如果 rootHistory 不存在,那么这个 hooks 也就没有任何作用,直接返回空函数就可以了。
- 如果 rootHistory 存在,通过 useEffect ,绑定监听器,然后在销毁函数中,解绑监听器。
# 高阶组件层面
希望通过一个 HOC 能够自由获取路由的状态。所以要实现一个 react-router 中 withRouter 功能。
# 获取路由状态——withRouter
import React , { useContext } from 'react'
import hoistStatics from 'hoist-non-react-statics'

import { RouterContext  } from '../component/Router'

export default function withRouter(Component){
    const WrapComponent = (props) =>{
        const { wrappedComponentRef, ...remainingProps } = props
        const context = useContext(RouterContext)
        return  <Component {...remainingProps}
            ref={wrappedComponentRef}
            {...context}
                />
    }
    return hoistStatics(WrapComponent,Component)
2
3
4
5
6
7
8
9
10
11
12
13
14
15
- 在高阶组件的包装组件中,用useContext获取路由状态,并传递给原始组件。
- 通过
hoist-non-react-statics继承原始组件的静态属性。
# 入口文件
完成了核心 api 和组件,接下来需要出口文件,把这些方法暴露出去。
//component
import Router ,{ RouterContext } from './component/Router'
import Route from './component/Route'
import Switch from './component/Switch'
//hooks
import useHistory from './hooks/useHistory'
import useListen from './hooks/useListen'
import useLocation from './hooks/useLocation'
//hoc
import withRouter from './hoc/withRouter'

export {
    Router,
    Switch,
    Route,
    RouterContext,
    useHistory,
    useListen,
    useLocation,
    withRouter
}
2
3
4
5
6
7
8
9
10
11
12
13
14
15
16
17
18
19
20
21
