# Vite HMR 热更新
# HMR 简介
live reload的方式在诸多的场景下却显得十分鸡肋,简单来说就是模块局部更新+状态保存的需求在live reload的方案没有得到满足,从而导致开发体验欠佳。
HMR 的全称叫做 Hot Module Replacement,即模块热替换或者模块热更新。在页面模块更新的时候,直接把页面中发生变化的模块替换为新的模块,同时不会影响其它模块的正常运作。
# 深入 HMR API
Vite 作为一个完整的构建工具,本身实现了一套 HMR 系统,值得注意的是,这套 HMR 系统基于原生的 ESM 模块规范来实现,在文件发生改变时 Vite 会侦测到相应 ES 模块的变化,从而触发相应的 API,实现局部的更新。
Vite 的 HMR API 基于一套完整的 ESM HMR 规范 (opens new window)来实现,这个规范由同时期的 no-bundle 构建工具 Snowpack、WMR 与 Vite 一起制定,是一个比较通用的规范。
HMR API 的类型定义:
interface ImportMeta {
  readonly hot?: {
    readonly data: any
    accept(): void
    accept(cb: (mod: any) => void): void
    accept(dep: string, cb: (mod: any) => void): void
    accept(deps: string[], cb: (mods: any[]) => void): void
    prune(cb: () => void): void
    dispose(cb: (data: any) => void): void
    decline(): void
    invalidate(): void
    on(event: string, cb: (...args: any[]) => void): void
  }
}
2
3
4
5
6
7
8
9
10
11
12
13
14
import.meta 对象为现代浏览器原生的一个内置对象,Vite 所做的事情就是在这个对象上的 hot 属性中定义了一套完整的属性和方法。因此,在 Vite 当中,你就可以通过 import.meta.hot 来访问关于 HMR 的这些属性和方法,比如 import.meta.hot.accept()。接下来,我们就来一一熟悉这些 API 的使用方式。
# 模块更新时逻辑: hot.accept
在 import.meta.hot 对象上有一个非常关键的方法 accept,因为它决定了 Vite 进行热更新的边界,那么如何来理解这个 accept 的含义呢?接受模块更新,一旦 Vite 接受了这个更新,当前模块就会被认为是 HMR 的边界。那么,Vite 接受谁的更新呢?这里会有三种情况:
- 接受自身模块的更新
- 接受某个子模块的更新
- 接受多个子模块的更新
# 共享数据: hot.data 属性
这个属性用来在不同的模块实例间共享一些数据。我们在 import.meta.hot.data 对象上挂载了一个count 属性,在二次执行initState的时候便会复用 import.meta.hot.data 上记录的 count 值,从而实现状态的保存。
# 其它方法
- import.meta.hot.decline()
这个方法调用之后,相当于表示此模块不可热更新,当模块更新时会强制进行页面刷新。
- import.meta.hot.invalidate()
这个方法就更简单了,只是用来强制刷新页面。
- 自定义事件
你还可以通过 import.meta.hot.on 来监听 HMR 的自定义事件,内部有这么几个事件会自动触发:
vite:beforeUpdate当模块更新时触发;vite:beforeFullReload当即将重新刷新页面时触发;vite:beforePrune当不再需要的模块即将被剔除时触发;vite:error当发生错误时(例如,语法错误)触发。
如果你想自定义事件可以通过上节中提到的 handleHotUpdate 这个插件 Hook 来进行触发:
// 插件 Hook
handleHotUpdate({ server }) {
  server.ws.send({
    type: 'custom',
    event: 'custom-update',
    data: {}
  })
  return []
}
// 前端代码
import.meta.hot.on('custom-update', (data) => {
  // 自定义更新逻辑
})
2
3
4
5
6
7
8
9
10
11
12
13
# HMR 原理
在代码发生变动的时候,Vite 会定位到发生变化的局部模块,也就是找到对应的 HMR 边界,然后基于这个边界进行更新,其他的模块并没有受到影响,这也是 Vite 中热更新的时间能达到毫秒级别的重要原因。基于 HMR Boundary (HMR 边界)的更新模式,即当一个模块发生变动时,Vite 会自动寻找更新边界,然后更新边界模块。
在 Vite 内部,服务端究竟是如何定位到 HMR 边界模块,以及客户端是如何接受更新并加载最新模块内容的呢?接下来深入 Vite 的底层实现,梳理 HMR 的各个实现要点:
# 创建模块依赖图
Vite 在 Dev Server 中创建了模块依赖图的数据结构,即 ModuleGraph 类,点击查看实现源码 (opens new window),Vite 中 HMR 边界模块的判定会依靠这个类来实现。
创建依赖图主要分为三个步骤:
- 初始化依赖图实例
- 创建依赖图节点
- 绑定各个模块节点的依赖关系
首先,Vite 在 Dev Server 启动时会初始化 ModuleGraph 的实例:
// pacakges/vite/src/node/server/index.ts
const moduleGraph: ModuleGraph = new ModuleGraph((url) =>
  container.resolveId(url)
);
2
3
4
ModuleGraph 这个类的实现。其中定义了若干个 Map,用来记录模块信息:
// 由原始请求 url 到模块节点的映射,如 /src/index.tsx
urlToModuleMap = new Map<string, ModuleNode>()
// 由模块 id 到模块节点的映射,其中 id 与原始请求 url,为经过 resolveId 钩子解析后的结果
idToModuleMap = new Map<string, ModuleNode>()
// 由文件到模块节点的映射,由于单文件可能包含多个模块,如 .vue 文件,因此 Map 的 value 值为一个集合
fileToModulesMap = new Map<string, Set<ModuleNode>>()
2
3
4
5
6
ModuleNode 对象即代表模块节点的具体信息,我们可以来看看它的数据结构:
class ModuleNode {
  // 原始请求 url
  url: string
  // 文件绝对路径 + query
  id: string | null = null
  // 文件绝对路径
  file: string | null = null
  type: 'js' | 'css'
  info?: ModuleInfo
  // resolveId 钩子返回结果中的元数据
  meta?: Record<string, any>
  // 该模块的引用方
  importers = new Set<ModuleNode>()
  // 该模块所依赖的模块
  importedModules = new Set<ModuleNode>()
  // 接受更新的模块
  acceptedHmrDeps = new Set<ModuleNode>()
  // 是否为`接受自身模块`的更新
  isSelfAccepting = false
  // 经过 transform 钩子后的编译结果
  transformResult: TransformResult | null = null
  // SSR 过程中经过 transform 钩子后的编译结果
  ssrTransformResult: TransformResult | null = null
  // SSR 过程中的模块信息
  ssrModule: Record<string, any> | null = null
  // 上一次热更新的时间戳
  lastHMRTimestamp = 0

  constructor(url: string) {
    this.url = url
    this.type = isDirectCSSRequest(url) ? 'css' : 'js'
  }
}
2
3
4
5
6
7
8
9
10
11
12
13
14
15
16
17
18
19
20
21
22
23
24
25
26
27
28
29
30
31
32
33
ModuleNode 中包含的信息比较多,你需要重点关注的是 importers 和 importedModules,这两条信息分别代表了当前模块被哪些模块引用以及它依赖了哪些模块,是构建整个模块依赖图的根基所在。
那么,Vite 是在什么时候创建 ModuleNode 节点的呢?我们可以到 Vite Dev Server 中的 transform 中间件一探究竟:
// packages/vite/src/node/server/middlewares/transform.ts
// 核心转换逻辑
const result = await transformRequest(url, server, {
  html: req.headers.accept?.includes('text/html')
})
2
3
4
5
可以看到,transform 中间件的主要逻辑是调用 transformRequest 方法,我们来进一步查看这个方法的核心代码实现:
// packages/vite/src/node/server/transformRequest.ts
// 从 ModuleGraph 查找模块节点信息
const module = await server.moduleGraph.getModuleByUrl(url)
// 如果有则命中缓存
const cached =
  module && (ssr ? module.ssrTransformResult : module.transformResult)
if (cached) {
  return cached
}
// 否则调用 PluginContainer 的 resolveId 和 load 方法对进行模块加载
const id = (await pluginContainer.resolveId(url))?.id || url
const loadResult = await pluginContainer.load(id, { ssr })
// 然后通过调用 ensureEntryFromUrl 方法创建 ModuleNode
const mod = await moduleGraph.ensureEntryFromUrl(url)
2
3
4
5
6
7
8
9
10
11
12
13
14
ensureEntryFromUrl 方法如何创建新的 ModuleNode 节点:
async ensureEntryFromUrl(rawUrl: string): Promise<ModuleNode> {
  // 实质是调用各个插件的 resolveId 钩子得到路径信息
  const [url, resolvedId, meta] = await this.resolveUrl(rawUrl)
  let mod = this.urlToModuleMap.get(url)
  if (!mod) {
    // 如果没有缓存,就创建新的 ModuleNode 对象
    // 并记录到 urlToModuleMap、idToModuleMap、fileToModulesMap 这三张表中
    mod = new ModuleNode(url)
    if (meta) mod.meta = meta
    this.urlToModuleMap.set(url, mod)
    mod.id = resolvedId
    this.idToModuleMap.set(resolvedId, mod)
    const file = (mod.file = cleanUrl(resolvedId))
    let fileMappedModules = this.fileToModulesMap.get(file)
    if (!fileMappedModules) {
      fileMappedModules = new Set()
      this.fileToModulesMap.set(file, fileMappedModules)
    }
    fileMappedModules.add(mod)
  }
  return mod
}
2
3
4
5
6
7
8
9
10
11
12
13
14
15
16
17
18
19
20
21
22
现在你应该明白了模块依赖图中各个 ModuleNode 节点是如何创建出来的,那么,各个节点的依赖关系是在什么时候绑定的呢?
我们不妨把目光集中到 vite:import-analysis 插件当中,在这个插件的 transform 钩子中,会对模块代码中的 import 语句进行分析,得到如下的一些信息:
importedUrls: 当前模块的依赖模块 url 集合。acceptedUrls: 当前模块中通过import.meta.hot.accept声明的依赖模块 url 集合。isSelfAccepting: 分析import.meta.hot.accept的用法,标记是否为接受自身更新的类型。
接下来会进入核心的模块依赖关系绑定的环节,核心代码如下:
// 引用方模块
const importerModule = moduleGraph.getModuleById(importer)
await moduleGraph.updateModuleInfo(
  importerModule,
  importedUrls,
  normalizedAcceptedUrls,
  isSelfAccepting
)
2
3
4
5
6
7
8
可以看到,绑定依赖关系的逻辑主要由 ModuleGraph 对象的 updateModuleInfo 方法实现,核心代码如下:
async updateModuleInfo(
  mod: ModuleNode,
  importedModules: Set<string | ModuleNode>,
  acceptedModules: Set<string | ModuleNode>,
  isSelfAccepting: boolean
) {
  mod.isSelfAccepting = isSelfAccepting
  mod.importedModules = new Set()
  // 绑定节点依赖关系
  for (const imported of importedModules) {
    const dep =
      typeof imported === 'string'
        ? await this.ensureEntryFromUrl(imported)
        : imported
    dep.importers.add(mod)
    mod.importedModules.add(dep)
  }

  // 更新 acceptHmrDeps 信息
  const deps = (mod.acceptedHmrDeps = new Set())
  for (const accepted of acceptedModules) {
    const dep =
      typeof accepted === 'string'
        ? await this.ensureEntryFromUrl(accepted)
        : accepted
    deps.add(dep)
  }
}
2
3
4
5
6
7
8
9
10
11
12
13
14
15
16
17
18
19
20
21
22
23
24
25
26
27
28
至此,模块间的依赖关系就成功进行绑定了。随着越来越多的模块经过 vite:import-analysis 的 transform 钩子处理,所有模块之间的依赖关系会被记录下来,整个依赖图的信息也就被补充完整了。
# 服务端收集更新模块
Vite 服务端如何根据这个图结构收集更新模块?
首先, Vite 在服务启动时会通过 chokidar 新建文件监听器:
// packages/vite/src/node/server/index.ts
import chokidar from 'chokidar'

// 监听根目录下的文件
const watcher = chokidar.watch(path.resolve(root));
// 修改文件
watcher.on('change', async (file) => {
  file = normalizePath(file)
  moduleGraph.onFileChange(file)
  await handleHMRUpdate(file, server)
})
// 新增文件
watcher.on('add', (file) => {
  handleFileAddUnlink(normalizePath(file), server)
})
// 删除文件
watcher.on('unlink', (file) => {
  handleFileAddUnlink(normalizePath(file), server, true)
})
2
3
4
5
6
7
8
9
10
11
12
13
14
15
16
17
18
19
然后,我们分别以修改文件、新增文件和删除文件这几个方面来介绍 HMR 在服务端的逻辑。
# 修改文件
当业务代码中某个文件被修改时,Vite 首先会调用 moduleGraph 的 onFileChange 对模块图中的对应节点进行清除缓存的操作:
class ModuleGraph {
  onFileChange(file: string): void {
    const mods = this.getModulesByFile(file)
    if (mods) {
      const seen = new Set<ModuleNode>()
      // 将模块的缓存信息去除
      mods.forEach((mod) => {
        this.invalidateModule(mod, seen)
      })
    }
  }

  invalidateModule(mod: ModuleNode, seen: Set<ModuleNode> = new Set()): void {
    mod.info = undefined
    mod.transformResult = null
    mod.ssrTransformResult = null
  }
}
2
3
4
5
6
7
8
9
10
11
12
13
14
15
16
17
18
然后正式进入 HMR 收集更新的阶段,主要逻辑在 handleHMRUpdate 函数中,代码简化后如下:
// packages/vite/src/node/server/hmr.ts
export async function handleHMRUpdate(
  file: string,
  server: ViteDevServer
): Promise<any> {
  const { ws, config, moduleGraph } = server
  const shortFile = getShortName(file, config.root)

  // 1. 配置文件/环境变量声明文件变化,直接重启服务
  // 代码省略

  // 2. 客户端注入的文件(vite/dist/client/client.mjs)更改
  // 给客户端发送 full-reload 信号,使之刷新页面
  if (file.startsWith(normalizedClientDir)) {
    ws.send({
      type: 'full-reload',
      path: '*'
    })
    return
  }
  // 3. 普通文件变动
  // 获取需要更新的模块
  const mods = moduleGraph.getModulesByFile(file)
  const timestamp = Date.now()
  // 初始化 HMR 上下文对象
  const hmrContext: HmrContext = {
    file,
    timestamp,
    modules: mods ? [...mods] : [],
    read: () => readModifiedFile(file),
    server
  }
  // 依次执行插件的 handleHotUpdate 钩子,拿到插件处理后的 HMR 模块
  for (const plugin of config.plugins) {
    if (plugin.handleHotUpdate) {
      const filteredModules = await plugin.handleHotUpdate(hmrContext)
      if (filteredModules) {
        hmrContext.modules = filteredModules
      }
    }
  }
  // updateModules——核心处理逻辑
  updateModules(shortFile, hmrContext.modules, timestamp, server)
}
2
3
4
5
6
7
8
9
10
11
12
13
14
15
16
17
18
19
20
21
22
23
24
25
26
27
28
29
30
31
32
33
34
35
36
37
38
39
40
41
42
43
44
从中可以看到,Vite 对于不同类型的文件,热更新的策略有所不同:
- 对于配置文件和环境变量声明文件的改动,Vite 会直接重启服务器。
- 对于客户端注入的文件(vite/dist/client/client.mjs)的改动,Vite 会给客户端发送
full-reload信号,让客户端刷新页面。 - 对于普通文件改动,Vite 首先会获取需要热更新的模块,然后对这些模块依次查找热更新边界,然后将模块更新的信息传给客户端。
其中,对于普通文件的热更新边界查找的逻辑,主要集中在 updateModules 函数中,让我们来看看具体的实现:
function updateModules(
  file: string,
  modules: ModuleNode[],
  timestamp: number,
  { config, ws }: ViteDevServer
) {
  const updates: Update[] = []
  const invalidatedModules = new Set<ModuleNode>()
  let needFullReload = false
  // 遍历需要热更新的模块
  for (const mod of modules) {
    invalidate(mod, timestamp, invalidatedModules)
    if (needFullReload) {
      continue
    }
    // 初始化热更新边界集合
    const boundaries = new Set<{
      boundary: ModuleNode
      acceptedVia: ModuleNode
    }>()
    // 调用 propagateUpdate 函数,收集热更新边界
    const hasDeadEnd = propagateUpdate(mod, boundaries)
    // 返回值为 true 表示需要刷新页面,否则局部热更新即可
    if (hasDeadEnd) {
      needFullReload = true
      continue
    }
    // 记录热更新边界信息
    updates.push(
      ...[...boundaries].map(({ boundary, acceptedVia }) => ({
        type: `${boundary.type}-update` as Update['type'],
        timestamp,
        path: boundary.url,
        acceptedPath: acceptedVia.url
      }))
    )
  }
  // 如果被打上 full-reload 标识,则让客户端强制刷新页面
  if (needFullReload) {
    ws.send({
      type: 'full-reload'
    })
  } else {
    config.logger.info(
      updates
        .map(({ path }) => chalk.green(`hmr update `) + chalk.dim(path))
        .join('\n'),
      { clear: true, timestamp: true }
    )
    ws.send({
      type: 'update',
      updates
    })
  }
}

// 热更新边界收集
function propagateUpdate(
  node: ModuleNode,
  boundaries: Set<{
    boundary: ModuleNode
    acceptedVia: ModuleNode
  }>,
  currentChain: ModuleNode[] = [node]
): boolean {
   // 接受自身模块更新
   if (node.isSelfAccepting) {
    boundaries.add({
      boundary: node,
      acceptedVia: node
    })
    return false
  }
  // 入口模块
  if (!node.importers.size) {
    return true
  }
  // 遍历引用方
  for (const importer of node.importers) {
    const subChain = currentChain.concat(importer)
    // 如果某个引用方模块接受了当前模块的更新
    // 那么将这个引用方模块作为热更新的边界
    if (importer.acceptedHmrDeps.has(node)) {
      boundaries.add({
        boundary: importer,
        acceptedVia: node
      })
      continue
    }

    if (currentChain.includes(importer)) {
      // 出现循环依赖,需要强制刷新页面
      return true
    }
    // 递归向更上层的引用方寻找热更新边界
    if (propagateUpdate(importer, boundaries, subChain)) {
      return true
    }
  }
  return false
}
2
3
4
5
6
7
8
9
10
11
12
13
14
15
16
17
18
19
20
21
22
23
24
25
26
27
28
29
30
31
32
33
34
35
36
37
38
39
40
41
42
43
44
45
46
47
48
49
50
51
52
53
54
55
56
57
58
59
60
61
62
63
64
65
66
67
68
69
70
71
72
73
74
75
76
77
78
79
80
81
82
83
84
85
86
87
88
89
90
91
92
93
94
95
96
97
98
99
100
101
可以看到,当热更新边界的信息收集完成后,服务端会将这些信息推送给客户端,从而完成局部的模块更新。
# 新增和删除文件
对于新增和删除文件,Vite 也通过 chokidar 监听了相应的事件:
watcher.on('add', (file) => {
  handleFileAddUnlink(normalizePath(file), server)
})

watcher.on('unlink', (file) => {
  handleFileAddUnlink(normalizePath(file), server, true)
})
2
3
4
5
6
7
接下来,我们就来浏览一下 handleFileAddUnlink 的逻辑,代码简化后如下:
export async function handleFileAddUnlink(
  file: string,
  server: ViteDevServer,
  isUnlink = false
): Promise<void> {
  const modules = [...(server.moduleGraph.getModulesByFile(file) ?? [])]

  if (modules.length > 0) {
    updateModules(
      getShortName(file, server.config.root),
      modules,
      Date.now(),
      server
    )
  }
}
2
3
4
5
6
7
8
9
10
11
12
13
14
15
16
不难发现,这个函数同样是调用 updateModules 完成模块热更新边界的查找和更新信息的推送。
# 客户端派发更新
从前面的内容中,我们知道,服务端会监听文件的改动,然后计算出对应的热更新信息,通过 WebSocket 将更新信息传递给客户端,具体来说,会给客户端发送如下的数据:
{
  type: "update",
  update: [
    {
      // 更新类型,也可能是 `css-update`
      type: "js-update",
      // 更新时间戳
      timestamp: 1650702020986,
      // 热更模块路径
      path: "/src/main.ts",
      // 接受的子模块路径
      acceptedPath: "/src/render.ts"
    }
  ]
}
// 或者 full-reload 信号
{
  type: "full-reload"
}
2
3
4
5
6
7
8
9
10
11
12
13
14
15
16
17
18
19
那么客户端是如何接受这些信息并进行模块更新的呢?
Vite 在开发阶段会默认在 HTML 中注入一段客户端的脚本,即:
<script type="module" src="/@vite/client"></script>
在启动任意一个 Vite 项目后,我们可以在浏览器查看具体的脚本内容:

从中你可以发现,客户端的脚本中创建了 WebSocket 客户端,并与 Vite Dev Server 中的 WebSocket 服务端 (opens new window)建立双向连接:
const socketProtocol = null || (location.protocol === 'https:' ? 'wss' : 'ws');
const socketHost = `${null || location.hostname}:${"3000"}`;
const socket = new WebSocket(`${socketProtocol}://${socketHost}`, 'vite-hmr');
2
3
随后会监听 socket 实例的 message 事件,接收到服务端传来的更新信息:
socket.addEventListener('message', async ({ data }) => {
  handleMessage(JSON.parse(data));
});
2
3
在 handleMessage 函数中:
async function handleMessage(payload: HMRPayload) {
  switch (payload.type) {
    case 'connected':
      console.log(`[vite] connected.`)
      // 心跳检测
      setInterval(() => socket.send('ping'), __HMR_TIMEOUT__)
      break
    case 'update':
      payload.updates.forEach((update) => {
        if (update.type === 'js-update') {
          queueUpdate(fetchUpdate(update))
        } else {
          // css-update
          // 省略实现
          console.log(`[vite] css hot updated: ${path}`)
        }
      })
      break
    case 'full-reload':
      // 刷新页面
      location.reload()
    // 省略其它消息类型
  }
}
2
3
4
5
6
7
8
9
10
11
12
13
14
15
16
17
18
19
20
21
22
23
24
我们先来看看 queueUpdate 和 fetchUpdate 这两个函数的实现:
let pending = false
let queued: Promise<(() => void) | undefined>[] = []

// 批量任务处理,不与具体的热更新行为挂钩,主要起任务调度作用
async function queueUpdate(p: Promise<(() => void) | undefined>) {
  queued.push(p)
  if (!pending) {
    pending = true
    await Promise.resolve()
    pending = false
    const loading = [...queued]
    queued = []
    ;(await Promise.all(loading)).forEach((fn) => fn && fn())
  }
}

// 派发热更新的主要逻辑
async function fetchUpdate({ path, acceptedPath, timestamp }: Update) {
  // 后文会介绍 hotModuleMap 的作用,你暂且不用纠结实现,可以理解为 HMR 边界模块相关的信息
  const mod = hotModulesMap.get(path)
  const moduleMap = new Map()
  const isSelfUpdate = path === acceptedPath

  // 1. 整理需要更新的模块集合
  const modulesToUpdate = new Set<string>()
  if (isSelfUpdate) {
    // 接受自身更新
    modulesToUpdate.add(path)
  } else {
    // 接受子模块更新
    for (const { deps } of mod.callbacks) {
      deps.forEach((dep) => {
        if (acceptedPath === dep) {
          modulesToUpdate.add(dep)
        }
      })
    }
  }
  // 2. 整理需要执行的更新回调函数
  // 注: mod.callbacks 为 import.meta.hot.accept 中绑定的更新回调函数,后文会介绍
  const qualifiedCallbacks = mod.callbacks.filter(({ deps }) => {
    return deps.some((dep) => modulesToUpdate.has(dep))
  })
  // 3. 对将要更新的模块进行失活操作,并通过动态 import 拉取最新的模块信息
  await Promise.all(
    Array.from(modulesToUpdate).map(async (dep) => {
      const disposer = disposeMap.get(dep)
      if (disposer) await disposer(dataMap.get(dep))
      const [path, query] = dep.split(`?`)
      try {
        const newMod = await import(
          /* @vite-ignore */
          base +
            path.slice(1) +
            `?import&t=${timestamp}${query ? `&${query}` : ''}`
        )
        moduleMap.set(dep, newMod)
      } catch (e) {
        warnFailedFetch(e, dep)
      }
    })
  )
  // 4. 返回一个函数,用来执行所有的更新回调
  return () => {
    for (const { deps, fn } of qualifiedCallbacks) {
      fn(deps.map((dep) => moduleMap.get(dep)))
    }
    const loggedPath = isSelfUpdate ? path : `${acceptedPath} via ${path}`
    console.log(`[vite] hot updated: ${loggedPath}`)
  }
}
2
3
4
5
6
7
8
9
10
11
12
13
14
15
16
17
18
19
20
21
22
23
24
25
26
27
28
29
30
31
32
33
34
35
36
37
38
39
40
41
42
43
44
45
46
47
48
49
50
51
52
53
54
55
56
57
58
59
60
61
62
63
64
65
66
67
68
69
70
71
对热更新的边界模块来讲,我们需要在客户端获取这些信息:
- 边界模块所接受(accept)的模块
- accept 的模块触发更新后的回调
我们知道,在 vite:import-analysis 插件中,会给包含热更新逻辑的模块注入一些工具代码,如下图所示:
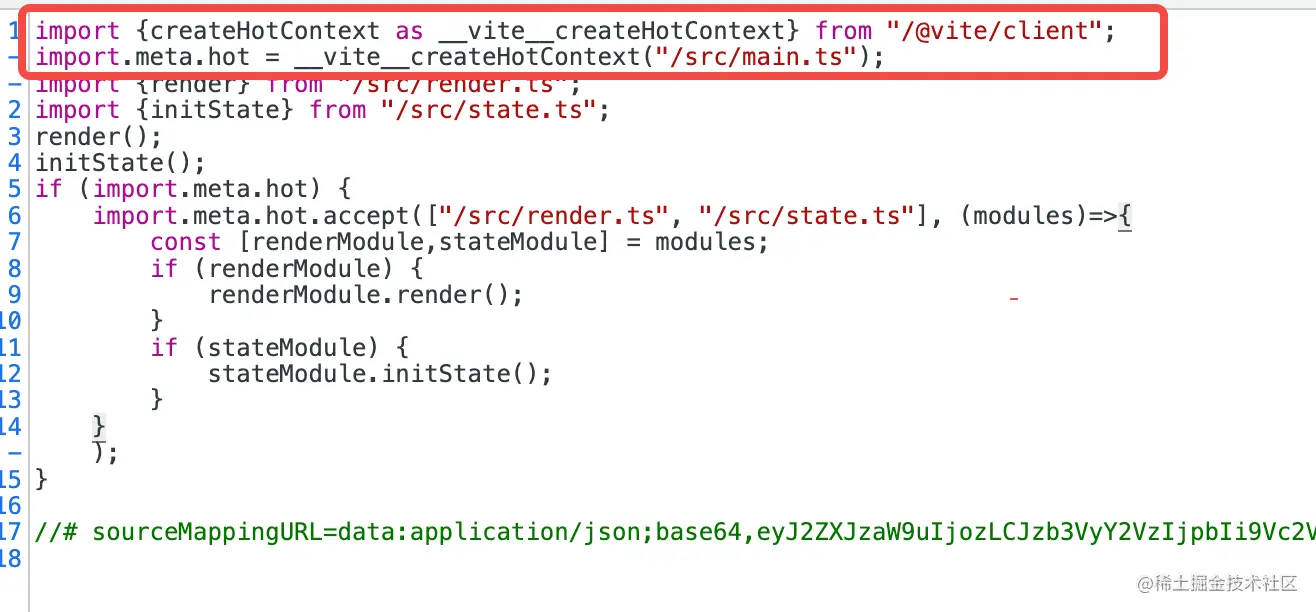
createHotContext 同样是客户端脚本中的一个工具函数,我们来看看它主要的实现:
const hotModulesMap = new Map<string, HotModule>()

export const createHotContext = (ownerPath: string) => {
  // 将当前模块的接收模块信息和更新回调注册到 hotModulesMap
  function acceptDeps(deps: string[], callback: HotCallback['fn'] = () => {}) {
    const mod: HotModule = hotModulesMap.get(ownerPath) || {
      id: ownerPath,
      callbacks: []
    }
    mod.callbacks.push({
      deps,
      fn: callback
    })
    hotModulesMap.set(ownerPath, mod)
  }
  return {
    // import.meta.hot.accept
    accept(deps: any, callback?: any) {
      if (typeof deps === 'function' || !deps) {
        acceptDeps([ownerPath], ([mod]) => deps && deps(mod))
      } else if (typeof deps === 'string') {
        acceptDeps([deps], ([mod]) => callback && callback(mod))
      } else if (Array.isArray(deps)) {
        acceptDeps(deps, callback)
      } else {
        throw new Error(`invalid hot.accept() usage.`)
      }
    },
    // import.meta.hot.dispose
    // import.meta.hot.invalidate
    // 省略更多方法的实现
  }
}
2
3
4
5
6
7
8
9
10
11
12
13
14
15
16
17
18
19
20
21
22
23
24
25
26
27
28
29
30
31
32
33
因此,Vite 给每个热更新边界模块注入的工具代码主要有两个作用:
- 注入
import.meta.hot对象的实现 - 将当前模块 accept 过的模块和更新回调函数记录到
hotModulesMap表中
而前面所说的 fetchUpdate 函数则是通过 hotModuleMap 来获取边界模块的相关信息,在 accept 的模块发生变动后,通过动态 import 拉取最新的模块内容,然后返回更新回调,让 queueUpdate 这个调度函数执行更新回调,从而完成派发更新的过程。至此,HMR 的过程就结束了。
首先,Vite 为了更方便地管理模块之间的关系,创建了模块依赖图的数据结构,在 HMR 过程中,服务端会根据这张图来寻找 HMR 边界模块。
其次,HMR 更新由客户端和服务端配合完成,两者通过 WebSocket 进行数据传输。在服务端,Vite 通过查找模块依赖图确定热更新的边界,并将局部更新的信息传递给客户端,而客户端接收到热更信息后,会通过动态 import 请求并加载最新模块的内容,并执行派发更新的回调,即 import.meta.hot.accept 中定义的回调函数,从而完成完整的热更新过程。
← Vite Plugin SSR 工程化 →