# Webpack Loader
如何扩展 Webpack?有两种主流方式:
- Loader —— 主要负责将资源内容翻译成 Webpack 能够理解、处理的 JavaScript 代码
- Plugin —— 深度介入 Webpack 构建过程,重塑 构建逻辑
# Loader 理解
Loader 通常是一种 mapping 函数形式,接收原始代码内容,返回翻译结果。在 Webpack 进入构建阶段后,首先会通过 IO 接口读取文件内容,之后调用 LoaderRunner (opens new window) 并将文件内容以 source 参数形式传递到 Loader 数组,source 数据在 Loader 数组内可能会经过若干次形态转换,最终以标准 JavaScript 代码提交给 Webpack 主流程,以此实现内容翻译功能。
Loader 本质上是导出为函数的 JavaScript 模块。它接收资源文件或者上一个 Loader 产生的结果作为入参,也可以用多个 Loader 函数组成 loader chain(链),最终输出转换后的结果。这里要注意的是,如果是组成的 loader chain(链),它们的执行顺序是从右向左,或者说是从下往上执行。loader chain(链) 这样设计的好处,是可以保证每个 Loader 的职责单一。同时,也方便后期 Loader 的组合和扩展
module.exports = function(source, sourceMap?, data?) {
  return source;
};
2
3
Loader 接收三个参数,分别为:
source:资源输入,对于第一个执行的 Loader 为资源文件的内容;后续执行的 Loader 则为前一个 Loader 的执行结果,可能是字符串,也可能是代码的 AST 结构;sourceMap: 可选参数,代码的 sourcemap (opens new window) 结构;data: 可选参数,其它需要在 Loader 链中传递的信息,比如 posthtml/posthtml-loader (opens new window) 就会通过这个参数传递额外的 AST 对象。
经过模块化包装之后,这段文本内容变成 Webpack 可以理解的 JavaScript,其它 Module 也就能引用、使用它了。
需要注意,Loader 中执行的各种资源内容转译操作通常都是 CPU 密集型 —— 这放在 JavaScript 单线程架构下可能导致性能问题;又或者异步 Loader 会挂起后续的加载器队列直到异步 Loader 触发回调,稍微不注意就可能导致整个加载器链条的执行时间过长。
为此,Webpack 默认会缓存 Loader 的执行结果直到资源或资源依赖发生变化,开发者需要对此有个基本的理解,必要时可以通过 this.cachable 显式声明不作缓存:
module.exports = function(source) {
  this.cacheable(false);
  // ...
  return output;
};
2
3
4
5
# Loader 类型
Loader 按类型分可以分为四种:
- 前置(pre)
- 普通(normal)
- 行内(inline)
- 后置(post)
我们平常使用的大多数就是 普通(normal)类型的,关键是 Loader 的类型和它本身没有任何关系,而是和配置的 enforce 属性有关系。
  module: {
    rules: [
      {
        test: /\.css$/,
        use: ["css-loader"],
        enforce: "pre", //这里也可以是 post,默认不写就是 normal
      },
    ],
  },
2
3
4
5
6
7
8
9
10
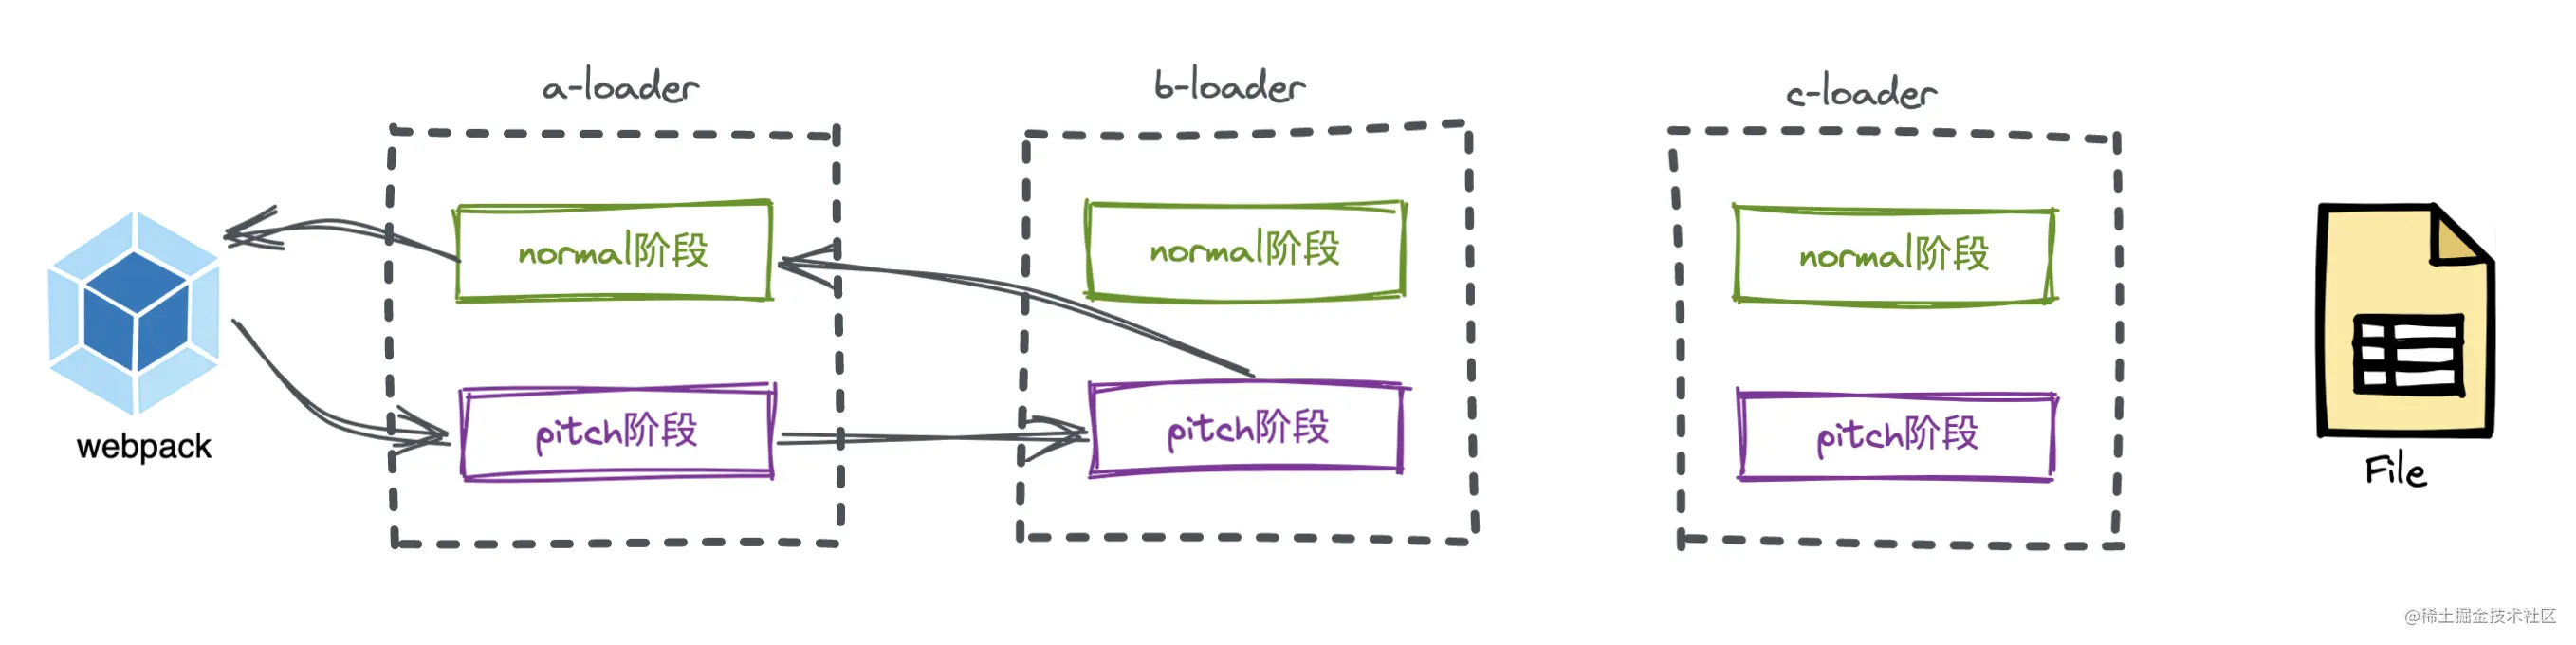
在上面讲 loader chain 的时候提到过 Loader 的执行顺序是由右向左,或者由下到上执行。其实这种说法的并不准确,在这里我引用官方的说法:
Pitching 阶段: Loader 上的 pitch 方法,按照
后置(post)、行内(inline)、普通(normal)、前置(pre)的顺序调用。Normal 阶段: Loader 上的 常规方法,按照
前置(pre)、普通(normal)、行内(inline)、后置(post)的顺序调用。模块源码的转换, 发生在这个阶段。同等类型下的 Loader 执行顺序才是由右向左,或者由下到上执行。
# Normal Loader
Loader 本质上是导出函数的 JavaScript 模块,而该模块导出的函数(若是 ES6 模块,则是默认导出的函数)就被称为 Normal Loader。 例如:
//a-loader.js
function ALoader(content, map, meta) {
  console.log("执行 a-loader 的normal阶段");
  return content + "//给你加点注释(来自于Aloader)";
}
module.exports = ALoader;
2
3
4
5
6
# Pitching Loader
其实我们在导出的 Loader 函数上还有一个可选属性:pitch。它的值也是一个函数,该函数就被称为Pitching Loader。
例如:
function ALoader(content, map, meta) {
  console.log("执行 a-loader 的normal阶段");
  return content + "//给你加点注释(来自于Aloader)";
}

ALoader.pitch = function () {
  console.log("ALoader的pitch阶段");
};

module.exports = ALoader;
2
3
4
5
6
7
8
9
10
结论:
在 Loader 的运行过程中,如果发现该 Loader 上有pitch属性,会先执行 pitch 阶段,再执行 normal 阶段。
结合 Loader 的 4 种类型,Loader 链的执行顺序如下:

Pitching 阶段: Loader 上的 pitch 方法,按照
后置(post)、行内(inline)、普通(normal)、前置(pre)的顺序调用。Normal 阶段: Loader 上的 常规方法,按照
前置(pre)、普通(normal)、行内(inline)、后置(post)的顺序调用。模块源码的转换, 发生在这个阶段。
注意:当一个 Loader 的 pitch 阶段有返回值时,将跳过后续 Loader 的 pitch 阶段,直接进行到该 Loader 的 normal 阶段。 - pitch 设计的目的:中断
# Loader 内联方式
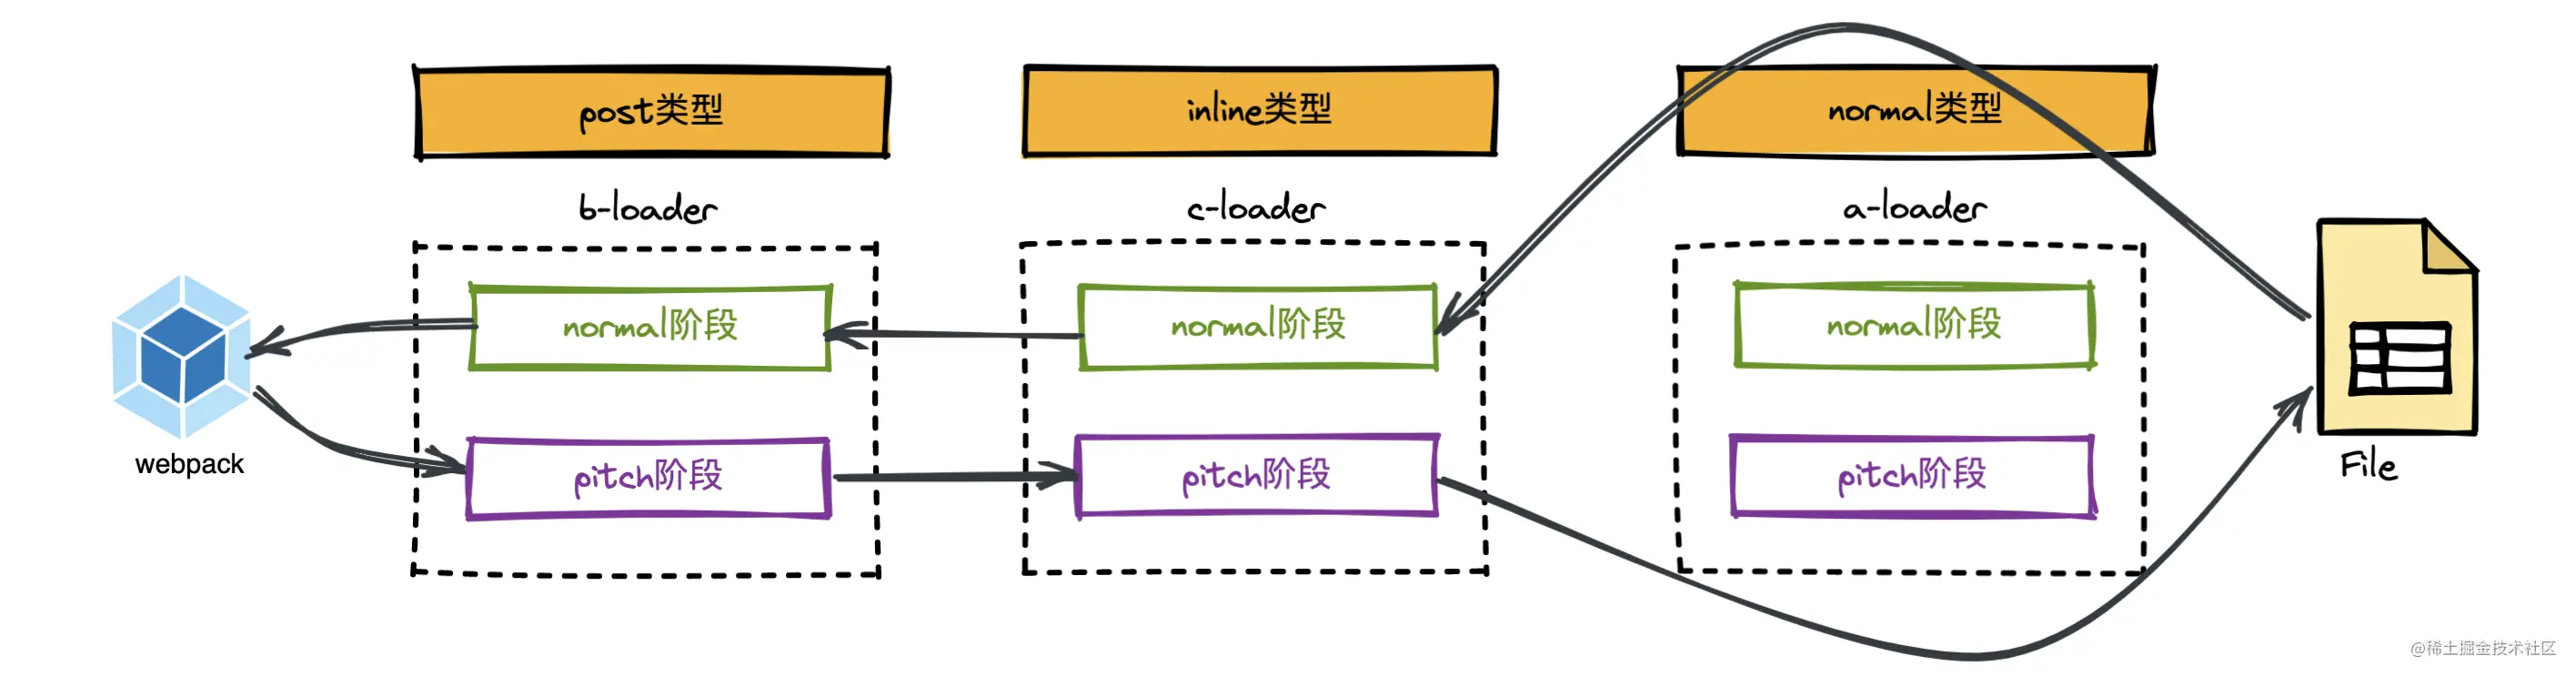
如果此时想指定执行某些类型的 Loader,忽略掉其他类型应该怎么办?
!:忽略normalloader-!:忽略preloader和normalloader!!:忽略所有loader(pre/noraml/post)
- 使用
!前缀,将禁用所有已配置的 normal loader(普通 loader)(通过为内联import语句添加前缀):
import test from "!c-loader!./test.js";

const a = 1;
2
3
此时 Loader 的执行顺序就变成了(忽略掉了 normal类型的 ALoader):
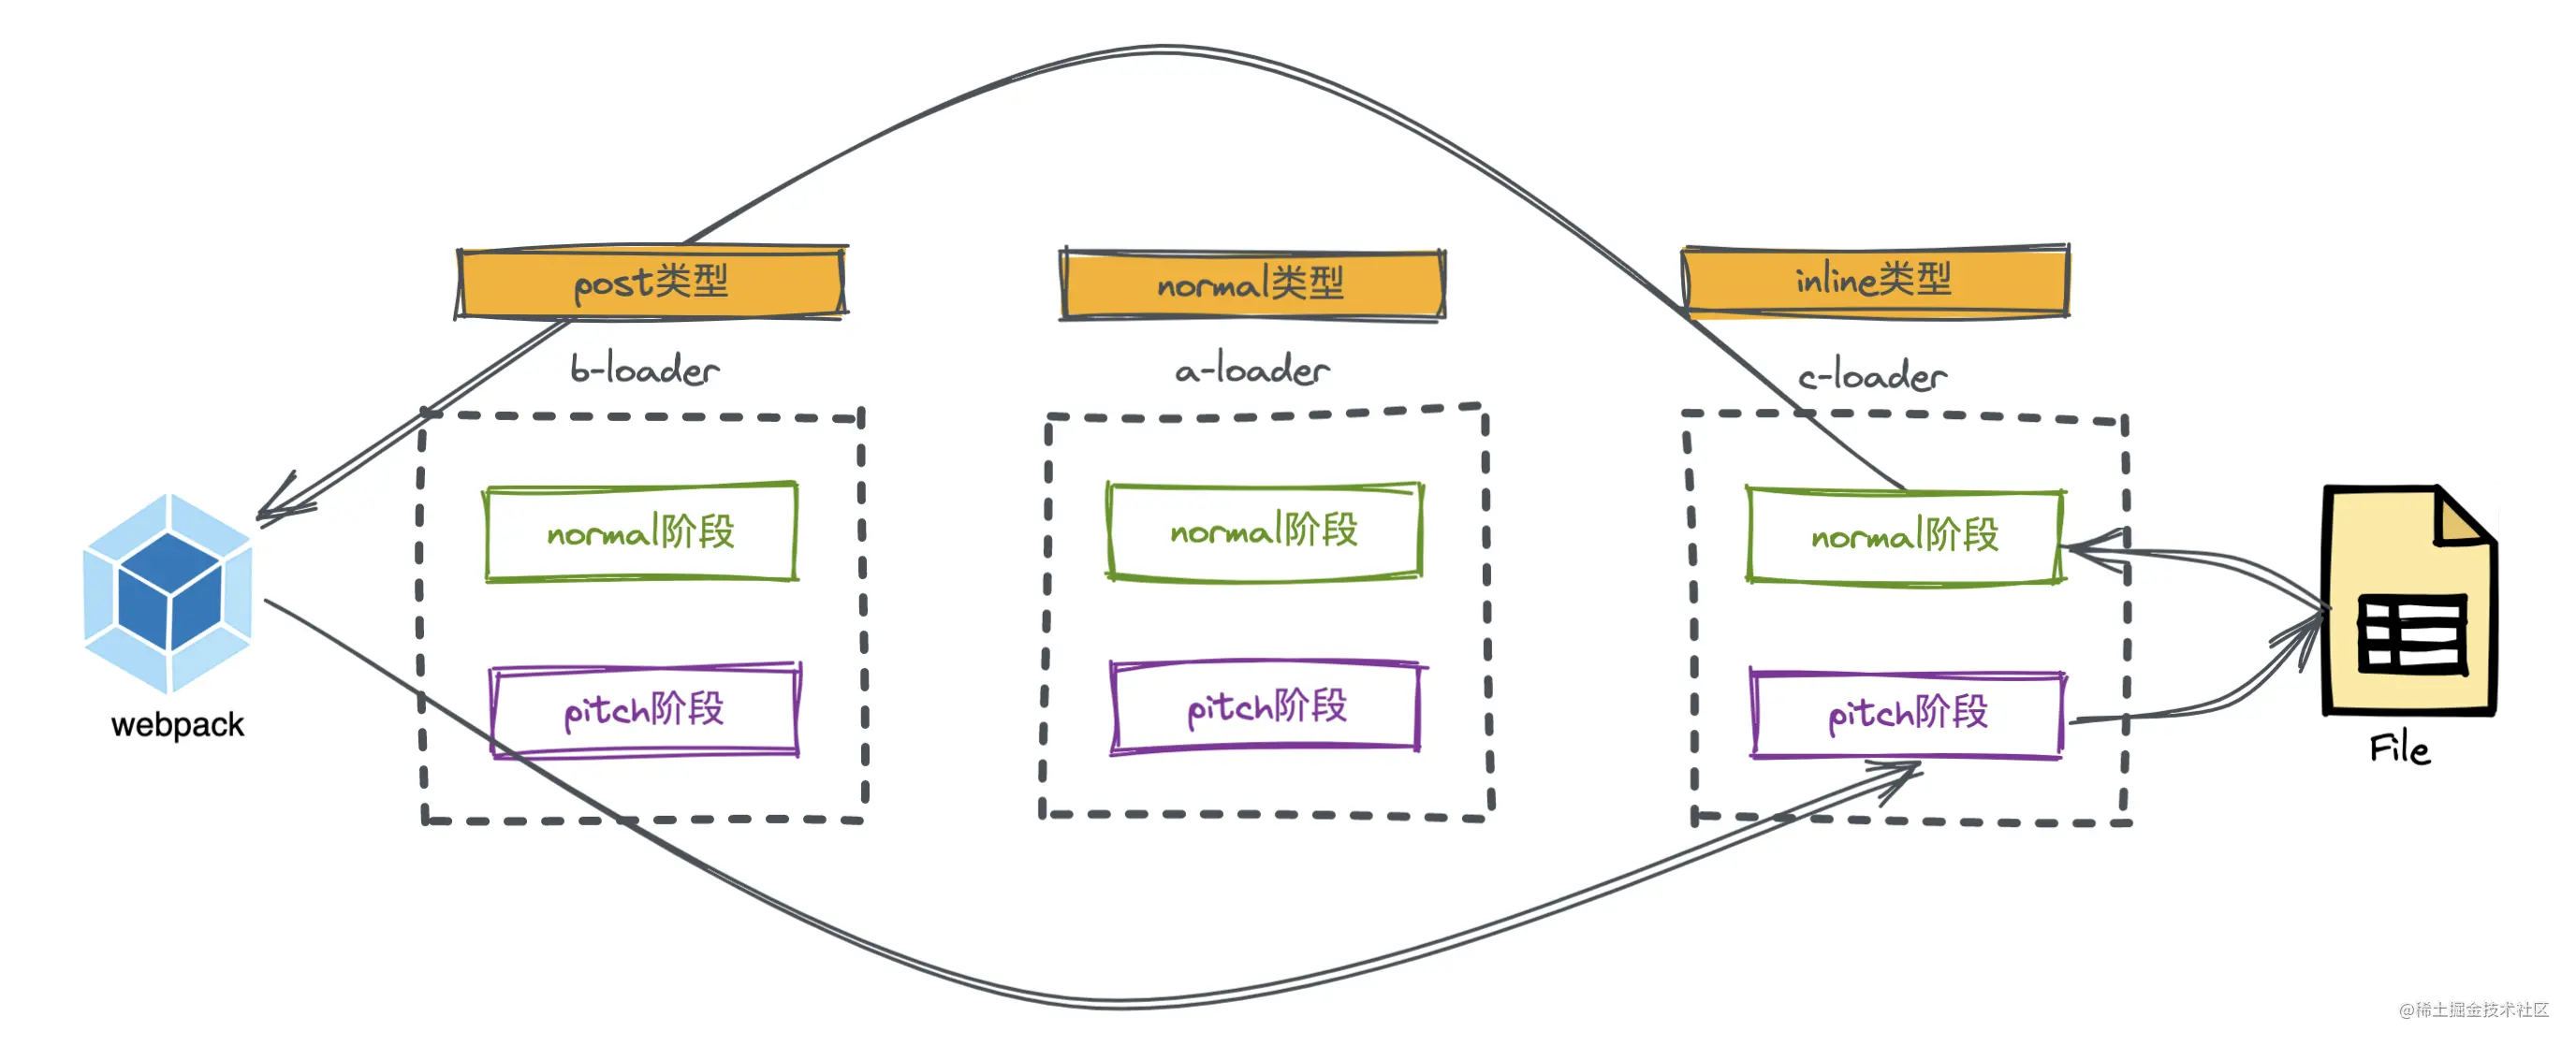
- 使用
!!前缀,将禁用其他类型的loader,只要内联loader
import test from "!!c-loader!./test.js";

const a = 1;
2
3
此时loader的执行顺序就变成了:
- 使用
-!前缀,将禁用所有已配置的 preLoader 和 loader,但是不禁用 postLoaders,也就是不要 pre 和 normal loader
import test from "-!c-loader!./test.js";

const a = 1;
2
3
此时loader的执行顺序就变成了:

# Loader 开发
# 使用上下文接口
除了作为内容转换器外,Loader 运行过程还可以通过一些上下文接口 (opens new window),有限制地影响 Webpack 编译过程,从而产生内容转换之外的副作用。上下文接口将在运行 Loader 时以 this 方式注入到 Loader 函数:
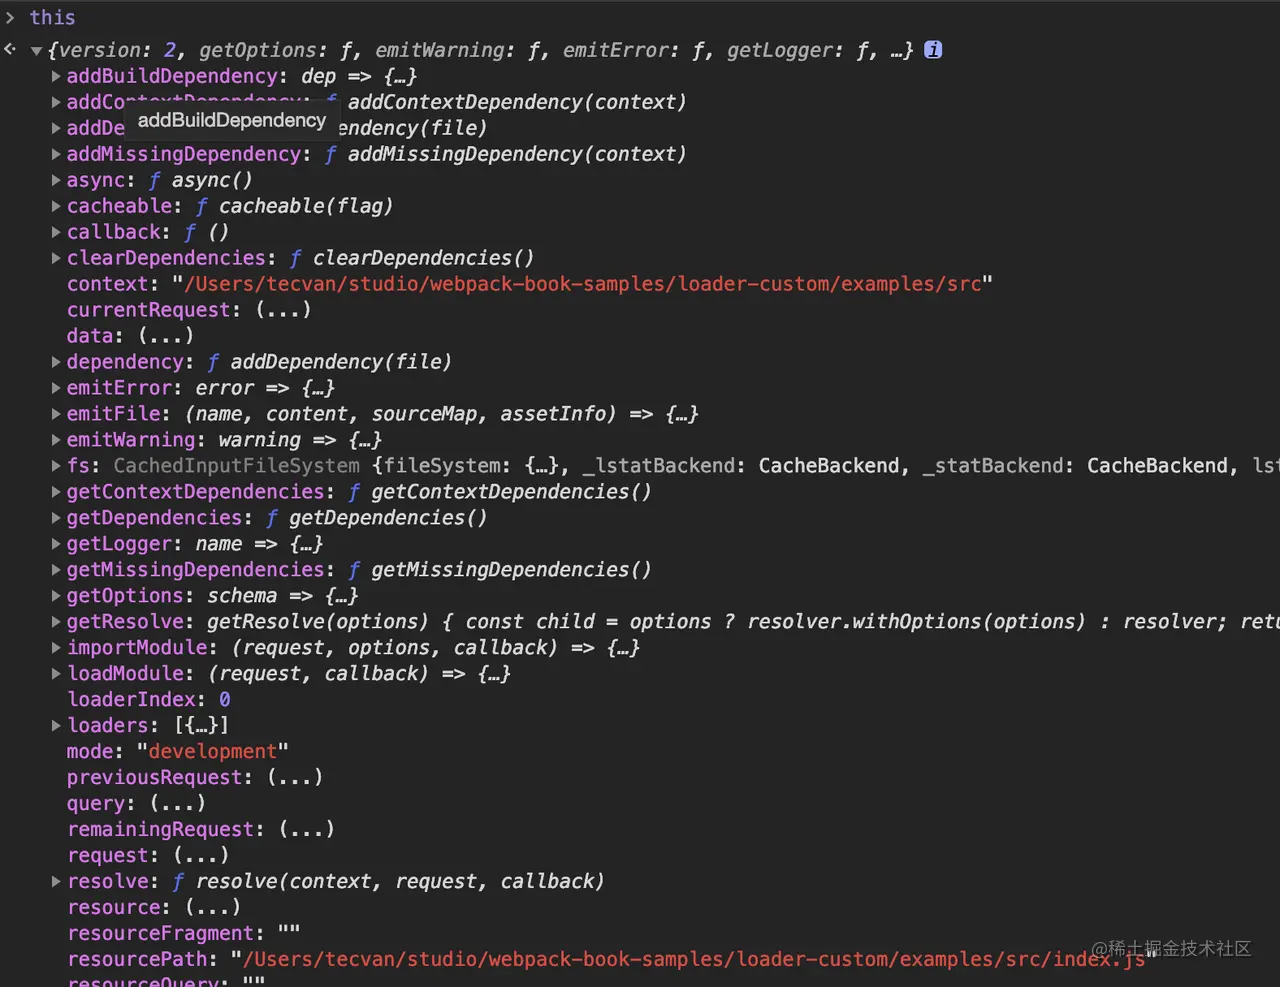
Webpack 官网对 Loader Context (opens new window) 已经有比较详细的说明,下面介绍几种常用接口
fs:Compilation 对象的inputFileSystem属性,我们可以通过这个对象获取更多资源文件的内容;resource:当前文件路径;resourceQuery:文件请求参数,例如import "./a?foo=bar"的resourceQuery值为?foo=bar;callback:可用于返回多个结果;getOptions:用于获取当前 Loader 的配置对象;async:用于声明这是一个异步 Loader,开发者需要通过async接口返回的callback函数传递处理结果;emitWarning:添加警告;emitError:添加错误信息,注意这不会中断 Webpack 运行;emitFile:用于直接写出一个产物文件,例如file-loader依赖该接口写出 Chunk 之外的产物;addDependency:将dep文件添加为编译依赖,当dep文件内容发生变化时,会触发当前文件的重新构建;
# 取消 Loader 缓存
Loader 中执行的各种资源内容转译操作通常都是 CPU 密集型 —— 这放在 JavaScript 单线程架构下可能导致性能问题;又或者异步 Loader 会挂起后续的加载器队列直到异步 Loader 触发回调,稍微不注意就可能导致整个加载器链条的执行时间过长。
为此,Webpack 默认会缓存 Loader 的执行结果直到模块或模块所依赖的其它资源发生变化,我们也可以通过 this.cacheable 接口显式关闭缓存
module.exports = function(source) {
  this.cacheable(false);
  // ...
  return output;
};
2
3
4
5
# 在 Loader 中返回多个结果
简单的 Loader 可直接 return 语句返回处理结果,复杂场景还可以通过 callback 接口返回更多信息,供下游 Loader 或者 Webpack 本身使用
export default function loader(content, map) {
  // ...
  linter.printOutput(linter.lint(content));
  this.callback(null, content, map);
}
2
3
4
5
通过 this.callback(null, content, map) 语句,同时返回转译后的内容与 sourcemap 内容。
this.callback(
    // 异常信息,Loader 正常运行时传递 null 值即可
    err: Error | null,
    // 转译结果
    content: string | Buffer,
    // 源码的 sourcemap 信息
    sourceMap?: SourceMap,
    // 任意需要在 Loader 间传递的值
    // 经常用来传递 ast 对象,避免重复解析
    data?: any
);
2
3
4
5
6
7
8
9
10
11
# 在 Loader 返回异步结果
涉及到异步或 CPU 密集操作时,Loader 中还可以以异步形式返回处理结果,例如 webpack-contrib/less-loader (opens new window) 的核心逻辑:
import less from "less";

async function lessLoader(source) {
  // 1. 获取异步回调函数
  const callback = this.async();
  // ...

  let result;

  try {
    // 2. 调用less 将模块内容转译为 css
    result = await (options.implementation || less).render(data, lessOptions);
  } catch (error) {
    // ...
  }

  const { css, imports } = result;

  // ...

  // 3. 转译结束,返回结果
  callback(null, css, map);
}

export default lessLoader;
2
3
4
5
6
7
8
9
10
11
12
13
14
15
16
17
18
19
20
21
22
23
24
25
在 less-loader 中,包含三个重要逻辑:
- 调用
this.async获取异步回调函数,此时 Webpack 会将该 Loader 标记为异步加载器,会挂起当前执行队列直到callback被触发; - 调用
less库将 less 资源转译为标准 css; - 调用异步回调
callback返回处理结果。
# 在 Loader 中直接写出文件
Loader Context 的 emitFile 接口可用于直接写出新的产物文件,例如在 file-loader 中:
export default function loader(content) {
  const options = getOptions(this);

  validate(schema, options, {
    name: 'File Loader',
    baseDataPath: 'options',
  });
  // ...

  if (typeof options.emitFile === 'undefined' || options.emitFile) {
    // ...
    this.emitFile(outputPath, content, null, assetInfo);
  }

  const esModule =
    typeof options.esModule !== 'undefined' ? options.esModule : true;

  return `${esModule ? 'export default' : 'module.exports ='} ${publicPath};`;
}

export const raw = true;
2
3
4
5
6
7
8
9
10
11
12
13
14
15
16
17
18
19
20
21
借助 emitFile 接口,我们能够在 Webpack 构建主流程之外提交更多产物,这有时候是必要的,除上面提到的 file-loader 外,response-loader 、mermaid-loader 等也依赖于 emitFile 实现构建功能。
# 在 Loader 中添加额外依赖
Loader Context 的 addDependency 接口用于添加额外的文件依赖,当这些依赖发生变化时,也会触发重新构建,例如在 less-loader 中包含这样一段代码:
  try {
    result = await (options.implementation || less).render(data, lessOptions);
  } catch (error) {
    // ...
  }

  const { css, imports } = result;

  imports.forEach((item) => {
    // ...
    this.addDependency(path.normalize(item));
  });
2
3
4
5
6
7
8
9
10
11
12
代码中首先调用 less 库编译文件内容,之后遍历所有 @import 语句(result.imports 数组),调用 this.addDependency 函数将 import 到的文件都注册为依赖,此后这些资源文件发生变化时都会触发重新编译。
为什么 less-loader 需要这么处理?因为 less 工具本身已经会递归所有 Less 文件树,一次性将所有 .less 文件打包在一起,例如在 a.less 中 @import (less) './b.less' ,a、b 文件会被 less 打包在一起。这里面的文件依赖对 Webpack 来说是无感知的,如果不用 addDependency 显式声明依赖,后续 b.less 文件的变化不会触发 a.less 重新构建,不符合预期啊。
所以,addDependency 接口适用于那些 Webpack 无法理解隐式文件依赖的场景。除上例 less-loader,babel-loader 也是一个特别经典的案例。在 babel-loader 内部会添加对 Babel 配置文件如 .babelrc 的依赖,当 .babelrc 内容发生变化时,也会触发 babel-loader 重新运行。
此外,Loader Context 还提供了下面几个与依赖处理相关的接口:
addContextDependency(directory: String):添加文件目录依赖,目录下内容变更时会触发文件变更;addMissingDependency(file: String):用于添加文件依赖,效果与addDependency类似;clearDependencies():清除所有文件依赖。
# 处理二进制资源
有时候我们期望以二进制方式读入资源文件,例如在 file-loader、image-loader 等场景中,此时只需要添加 export const raw = true 语句即可,如:
export default function loader(source) {/* ... */}

export const raw = true;
2
3
之后,loader 函数中获取到的第一个参数 source 将会是 Buffer 对象形式的二进制内容。
# 在 Loader 中处理日志
Webpack 内置了一套 infrastructureLogging (opens new window) 接口,专门用于处理 Webpack 内部及各种第三方组件的日志需求,与 log4js (opens new window)、winston (opens new window) 等日志工具类似,infrastructureLogging (opens new window) 也提供了根据日志分级筛选展示功能,从而将日志的写逻辑与输出逻辑解耦。
因此,在编写 Loader 时也应该尽可能复用 Webpack 内置的这套 Logging 规则,方法很简单,只需使用 Loader Context 的 getLogger (opens new window) 接口
export default function loader(source) {
  const logger = this.getLogger("xxx-loader");
  // 使用适当的 logging 接口
  // 支持:verbose/log/info/warn/error
  logger.info("information");

  return source;
}
2
3
4
5
6
7
8
getLogger 返回的 logger 对象支持 verbose/log/info/warn/error 五种级别的日志,最终用户可以通过 infrastructureLogging.level (opens new window) 配置项筛选不同日志内容
# 在 Loader 中上报异常
- 一般应尽量使用
logger.error,减少对用户的打扰; - 对于需要明确警示用户的错误,优先使用
this.emitError; - 对于已经严重到不能继续往下编译的错误,使用
callback。
# Loader 链式调用模型
举个例子,为了读取 less 文件,我们通常需要同时配置多个加载器:
module.exports = {
  module: {
    rules: [
      {
        test: /\.less$/i,
        use: ["style-loader", "css-loader", "less-loader"],
      },
    ],
  },
};
2
3
4
5
6
7
8
9
10
示例针对 .less 后缀的文件设定了 less、css、style 三个 Loader,Webpack 启动后会以一种所谓“链式调用”的方式按 use 数组顺序从后到前调用 Loader:

- 首先调用
less-loader将 Less 代码转译为 CSS 代码; - 将
less-loader结果传入css-loader,进一步将 CSS 内容包装成类似module.exports = "${css}"的 JavaScript 代码片段; - 将
css-loader结果传入style-loader,在运行时调用 injectStyle 等函数,将内容注入到页面的<style>标签。
三个 Loader 分别完成内容转化工作的一部分,形成从右到左的执行链条。链式调用这种设计有两个好处,一是保持单个 Loader 的单一职责,一定程度上降低代码的复杂度;二是细粒度的功能能够被组装成复杂而灵活的处理链条,提升单个 Loader 的可复用性。
不过,这只是链式调用的一部分,这里面有两个问题:
- Loader 链条一旦启动之后,需要所有 Loader 都执行完毕才会结束,没有中断的机会 —— 除非显式抛出异常;
- 某些场景下并不需要关心资源的具体内容,但 Loader 需要在 source 内容被读取出来之后才会执行。
为了解决这两个问题,Webpack 在 Loader 基础上叠加了 pitch 的概念。
# 什么是 pitch
Webpack 允许在 Loader 函数上挂载名为 pitch 的函数,运行时 pitch 会比 Loader 本身更早执行
const loader = function (source){
    console.log('后执行')
    return source;
}

loader.pitch = function(requestString) {
    console.log('先执行')
}

module.exports = loader
2
3
4
5
6
7
8
9
10
Pitch 函数的完整签名
function pitch(
    remainingRequest: string, previousRequest: string, data = {}
): void {
}
2
3
4
remainingRequest: 当前 loader 之后的资源请求字符串;previousRequest: 在执行当前 loader 之前经历过的 loader 列表;data: 与 Loader 函数的data相同,用于传递需要在 Loader 传播的信息。
# pitch 函数调度逻辑
Loader 链条执行过程分三个阶段:
- pitch、解析资源、执行,设计上与 DOM 的事件模型非常相似,pitch 对应到捕获阶段;
- 执行对应到冒泡阶段;
- 而两个阶段之间 Webpack 会执行资源内容的读取、解析操作,对应 DOM 事件模型的 AT_TARGET 阶段:
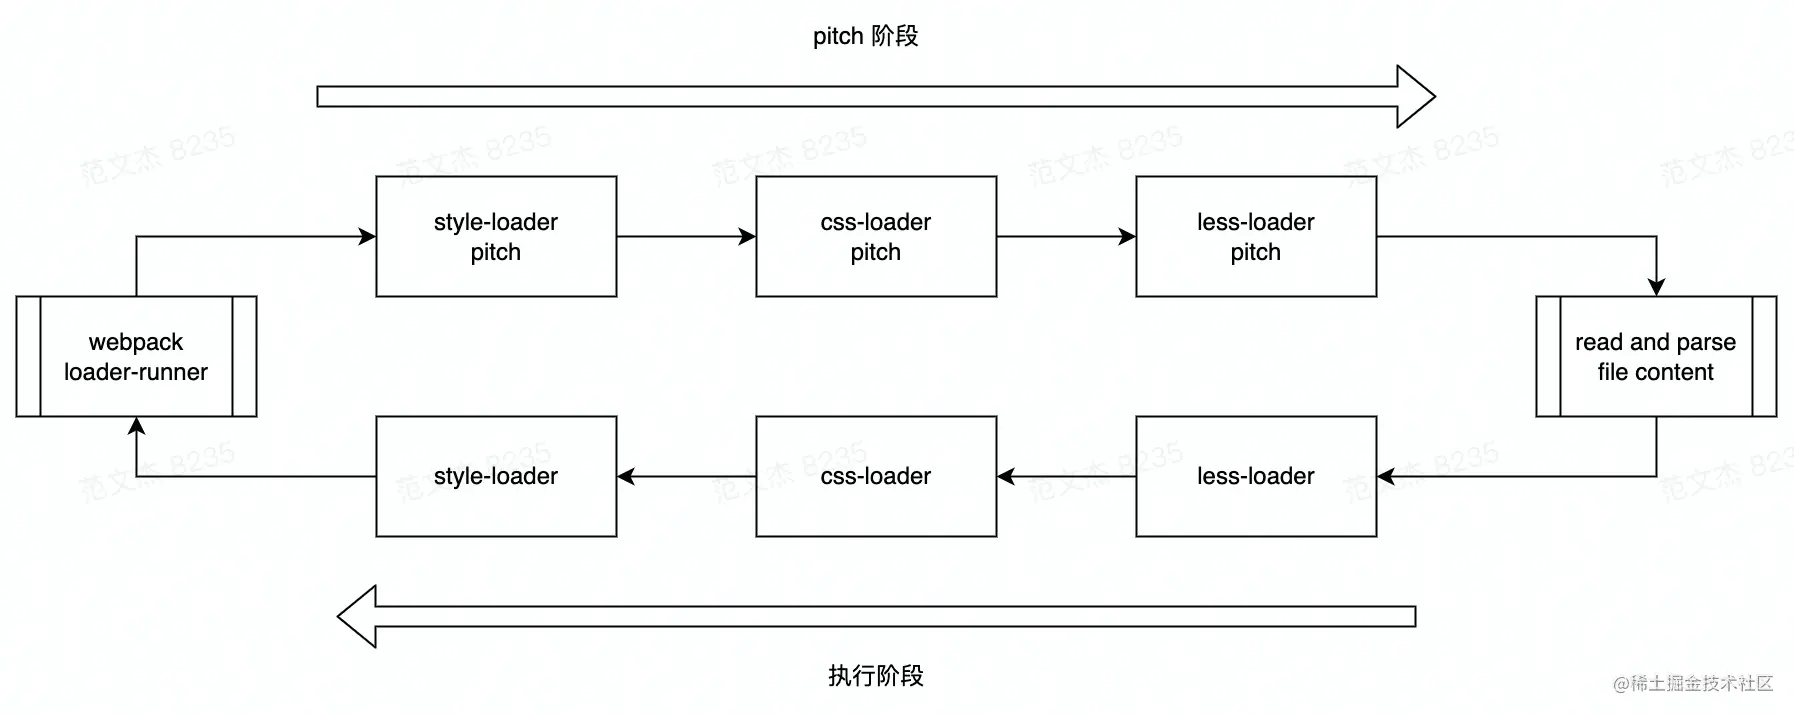
pitch 阶段按配置顺序从左到右逐个执行 loader.pitch 函数(如果有的话),开发者可以在 pitch 返回任意值中断后续的链路的执行:
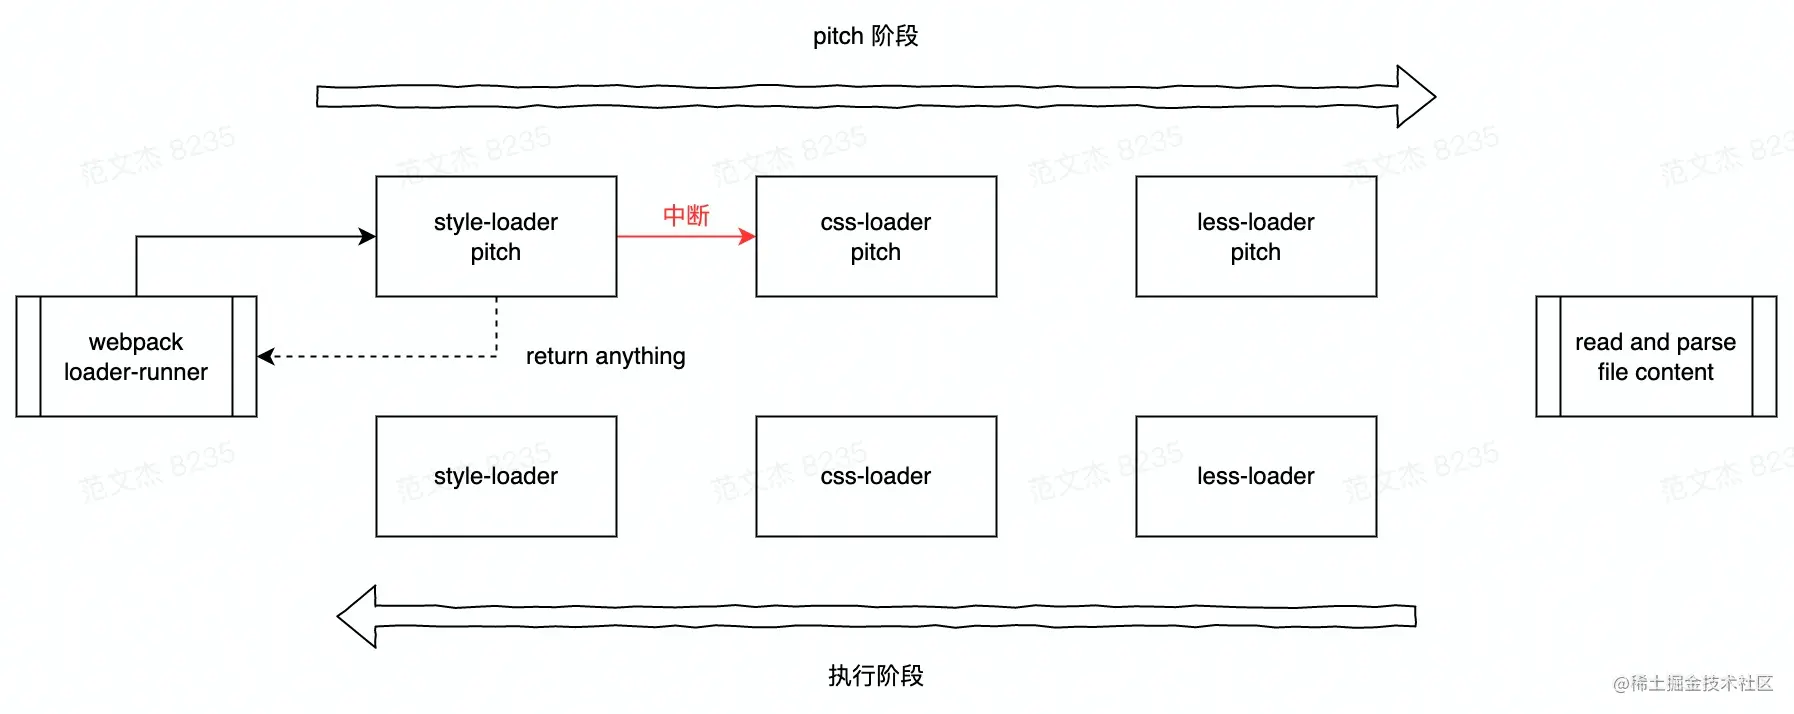
那么为什么要设计 pitch 这一特性呢?阻断!
回顾一下前面提到过的 less 加载链条:
less-loader:将 less 规格的内容转换为标准 css;css-loader:将 css 内容包裹为 JavaScript 模块;style-loader:将 JavaScript 模块的导出结果以link、style标签等方式挂载到 html 中,让 css 代码能够正确运行在浏览器上。
实际上, style-loader 只是负责让 CSS 在浏览器环境下跑起来,并不需要关心具体内容,很适合用 pitch 来处理:
// ...
// Loader 本身不作任何处理
const loaderApi = () => {};

// pitch 中根据参数拼接模块代码
loaderApi.pitch = function loader(remainingRequest) {
  //...

  switch (injectType) {
    case 'linkTag': {
      return `${
        esModule
          ? `...`
          // 引入 runtime 模块
          : `var api = require(${loaderUtils.stringifyRequest(
              this,
              `!${path.join(__dirname, 'runtime/injectStylesIntoLinkTag.js')}`
            )});
            // 引入 css 模块
            var content = require(${loaderUtils.stringifyRequest(
              this,
              `!!${remainingRequest}`
            )});

            content = content.__esModule ? content.default : content;`
      } // ...`;
    }

    case 'lazyStyleTag':
    case 'lazySingletonStyleTag': {
        //...
    }

    case 'styleTag':
    case 'singletonStyleTag':
    default: {
        // ...
    }
  }
};

export default loaderApi;
2
3
4
5
6
7
8
9
10
11
12
13
14
15
16
17
18
19
20
21
22
23
24
25
26
27
28
29
30
31
32
33
34
35
36
37
38
39
40
41
42
关键点:
loaderApi为空函数,不做任何处理;loaderApi.pitch中拼接结果,导出的代码包含:- 引入运行时模块
runtime/injectStylesIntoLinkTag.js; - 复用
remainingRequest参数,重新引入 css 文件。
- 引入运行时模块
运行后,关键结果大致如:
var api = require('xxx/style-loader/lib/runtime/injectStylesIntoLinkTag.js')
var content = require('!!css-loader!less-loader!./xxx.less');
2
注意了,到这里 style-loader 的 pitch 函数返回这一段内容,后续的 Loader 就不会继续执行,当前调用链条中断了:
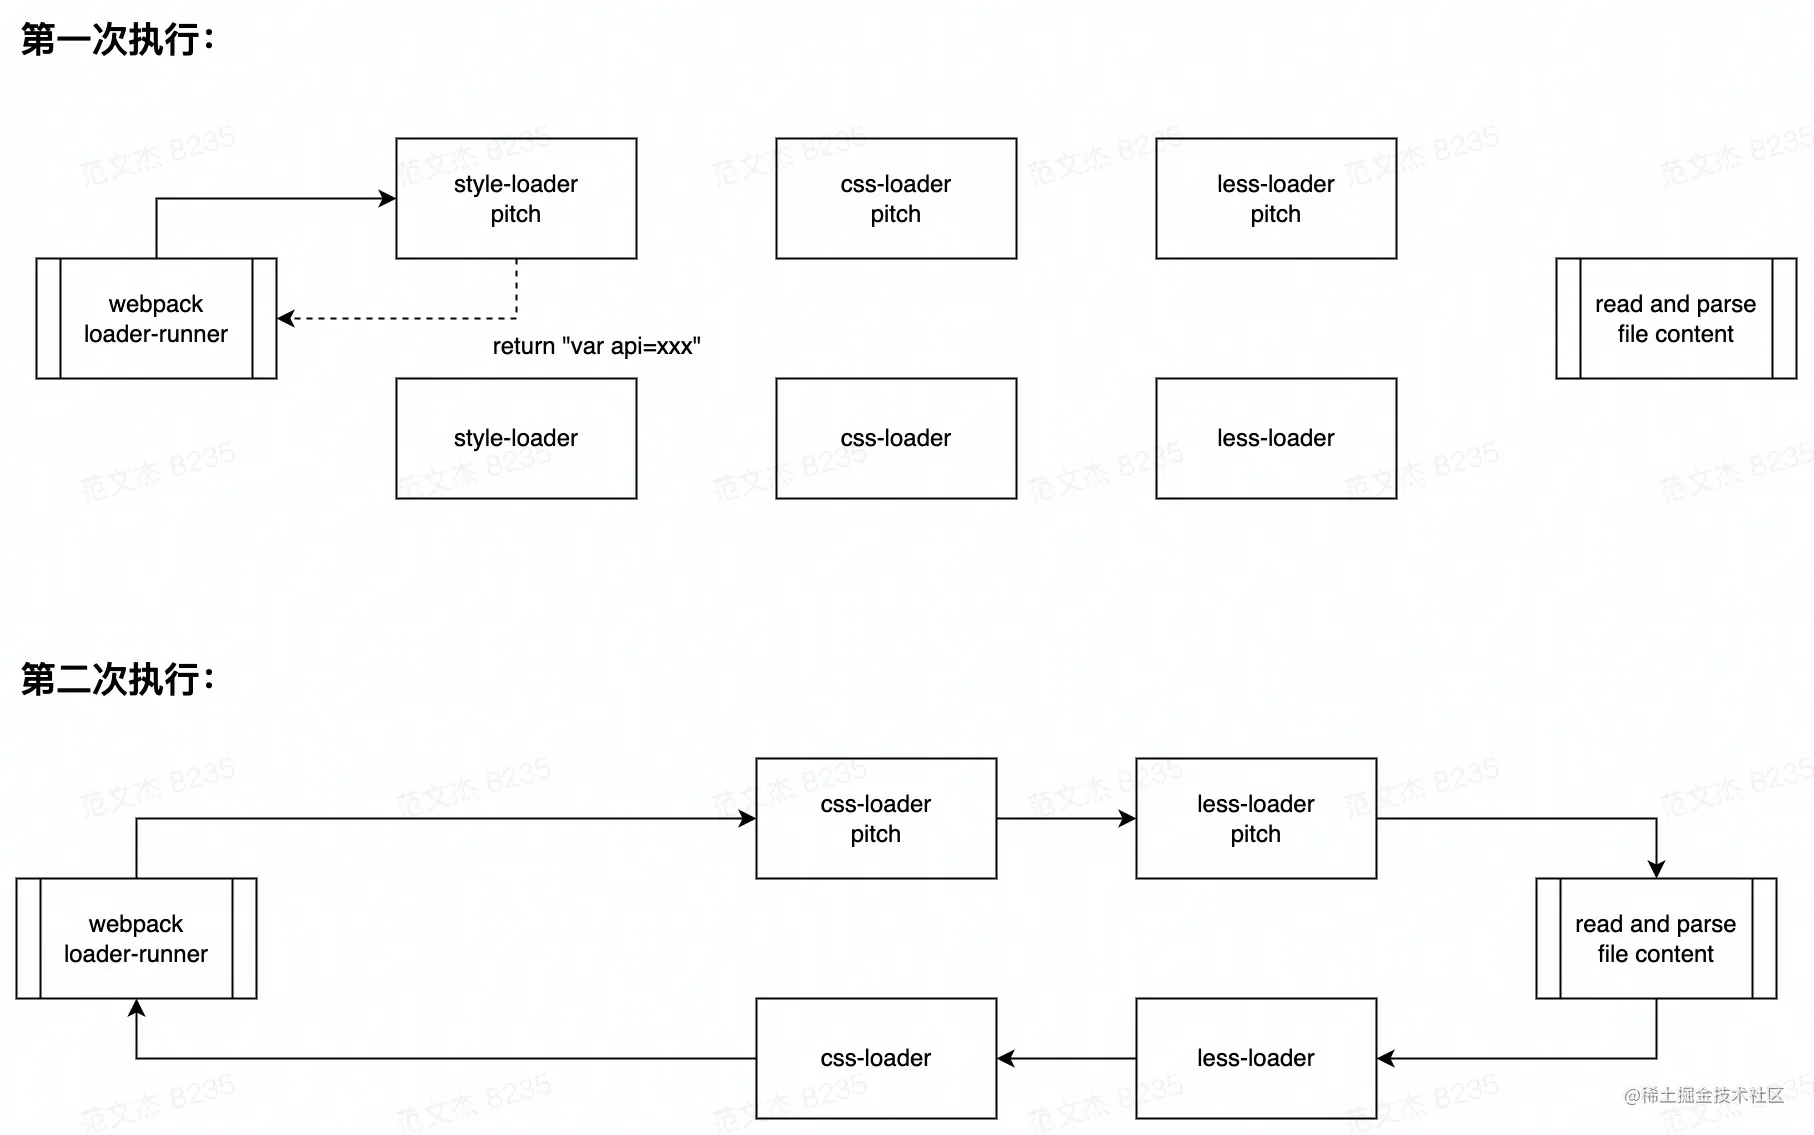
之后,Webpack 继续解析、构建 style-loader 返回的结果,遇到 inline loader 语句:
var content = require('!!css-loader!less-loader!./xxx.less');
所以从 Webpack 的角度看,对同一个文件实际调用了两次 loader 链,第一次在 style-loader 的 pitch 中断,第二次根据 inline loader 的内容跳过了 style-loader。
# Loader 辅助工具
Loader 辅助工具,包括:
- 了解
loader-utils,并使用loader-utils拼接文件名; - 了解
schema-tiles,以及其背后的ajv库与 JSON-Schema 协议,学习使用schema-utils实现参数校验。
# 使用 schema-utils
Webpack,以及 Webpack 生态下的诸多 Loader、Plugin 基本上都会提供若干“配置项”,供用户调整组件的运行逻辑,这些组件内部通常都会使用 schema-utils (opens new window) 工具库校验用户传入的配置是否满足要求。
编写配置对象的 Schema 描述,例如:
// options.json
{
  "type": "object",
  "properties": {
    "name": {
      "type": "boolean"
    }
  },
  "required": ["name"],
  "additionalProperties": false
}
2
3
4
5
6
7
8
9
10
11
在 Loader 中调用 schema-utils 校验配置对象
import { validate } from "schema-utils";
import schema from "./options.json";

// 调用 schema-utils 完成校验
export default function loader(source) {
  const options = this.getOptions();
  validate(schema, options);

  return source;
}

// Webpack5 之后还可以借助 Loader Context 的 `getOptions` 接口完成校验
export default function loader(source) {
  const options = this.getOptions(schema);

  return source;
}
2
3
4
5
6
7
8
9
10
11
12
13
14
15
16
17
schema-utils 的校验能力很强,能够完美支撑起 Webpack 生态下非常复杂的参数校验需求,底层主要依赖于 ajv (opens new window) 。
Webpack 官方选择 ajv 作用配置参数的校验工具,并将其二次封装为 schema-utils 库,供 Webpack 生态下的诸多 Loader、Plugin 使用。而上面介绍的基础类型、类型校验、复合校验规则等内容是 ajv 非常基础且重要的知识点,三者协作组成 ajv 校验 schema 的框架结构,除此之外还有许多增强 Schema 表述能力的增强指令,包括:$data、$ref、definitions 等,篇幅关系这里不一一列举。同学们也可以参考 Webpack 官方编写的 Schema 文件 (opens new window),学习各种校验规则的写法。
# 使用 loader-utils
在 Webpack5 之前,loader-utils (opens new window) 是一个非常重要的 Loader 开发辅助工具,为开发者提供了诸如 getOptions/getCurrentRequest/parseQuery 等核心接口,这些接口被诸多 Loader 广泛使用,到 Webpack5 之后干脆将这部分能力迁移到 Loader Context,致使 loader-utils 被大幅裁减简化。
被裁减后的 loader-utils 仅保留了四个接口:
urlToRequest:用于将模块路径转换为文件路径的工具函数;isUrlRequest:用于判定字符串是否为模块请求路径;getHashDigest:用于计算内容 Hash 值;interpolateName:用于拼接文件名的模板工具;
# vue-loader 原理
vue-loader 是一个综合性很强的示例,它借助 Webpack 与组件的一系列特性巧妙地解决了:如何区分 Vue SFC 不同代码块,并复用其它 Loader 处理不同区块的内容?
先从结构说起,vue-loader 内部实际上包含了三个组件:
lib/index.js定义的 Normal Loader,负责将 Vue SFC 不同区块转化为 JavaScriptimport语句,具体逻辑下面细讲;lib/loaders/pitcher.js定义的 Pitch Loader,负责遍历的rules数组,拼接出完整的行内引用路径;lib/plugin.js定义的插件,负责初始化编译环境,如复制原始rules配置等;
三者协作共同完成对 SFC 的处理,使用时需要用户同时注册 Normal Loader 和 Plugin,如:
const VueLoaderPlugin = require("vue-loader/lib/plugin");

module.exports = {
  module: {
    rules: [
      {
        test: /.vue$/,
        use: [{ loader: "vue-loader" }],
      }
    ],
  },
  plugins: [
    new VueLoaderPlugin()
  ],
};
2
3
4
5
6
7
8
9
10
11
12
13
14
15
vue-loader 运行过程大致上可以划分为两个阶段:
- 预处理阶段:动态修改 Webpack 配置,注入
vue-loader专用的一系列module.rules; - 内容处理阶段:Normal Loader 配合 Pitch Loader 完成文件内容转译。
# 预处理阶段
vue-loader 插件会在 apply 函数中动态修改 Webpack 配置,核心代码如下:
class VueLoaderPlugin {
  apply (compiler) {
    // ...

    const rules = compiler.options.module.rules
    // ...

    const clonedRules = rules
      .filter(r => r !== rawVueRules)
      .map((rawRule) => cloneRule(rawRule, refs))

    // ...

    // global pitcher (responsible for injecting template compiler loader & CSS
    // post loader)
    const pitcher = {
      loader: require.resolve('./loaders/pitcher'),
      resourceQuery: query => {
        if (!query) { return false }
        const parsed = qs.parse(query.slice(1))
        return parsed.vue != null
      }
      // ...
    }

    // replace original rules
    compiler.options.module.rules = [
      pitcher,
      ...clonedRules,
      ...rules
    ]
  }
}

function cloneRule (rawRule, refs) {
    // ...
}

module.exports = VueLoaderPlugin
2
3
4
5
6
7
8
9
10
11
12
13
14
15
16
17
18
19
20
21
22
23
24
25
26
27
28
29
30
31
32
33
34
35
36
37
38
39
拆开来看,插件主要完成两个任务:
初始化并注册 Pitch Loader:代码第16行,定义pitcher对象,指定loader路径为
require.resolve('./loaders/pitcher'),并将pitcher注入到rules数组首位。这种动态注入的好处是用户不用关注 —— 不去看源码根本不知道还有一个 pitcher loader,而且能保证 pitcher 能在其他 rule 之前执行,确保运行顺序。复制
rules配置:代码第8行遍历compiler.options.module.rules数组,也就是用户提供的 Webpack 配置中的module.rules项,对每个rule执行cloneRule方法复制规则对象。
之后,将 Webpack 配置修改为 [pitcher, ...clonedRules, ...rules]
module.exports = {
  module: {
    rules: [
      {
        test: /.vue$/i,
        use: [{ loader: "vue-loader" }],
      },
      {
        test: /\.css$/i,
        use: [MiniCssExtractPlugin.loader, "css-loader"],
      },
      {
        test: /\.js$/i,
        exclude: /node_modules/,
        use: {
          loader: "babel-loader",
          options: {
            presets: [["@babel/preset-env", { targets: "defaults" }]],
          },
        },
      },
    ],
  },
  plugins: [
    new VueLoaderPlugin(),
    new MiniCssExtractPlugin({ filename: "[name].css" }),
  ],
};
2
3
4
5
6
7
8
9
10
11
12
13
14
15
16
17
18
19
20
21
22
23
24
25
26
27
28
这里定义了三个 rule,分别对应 vue、js、css 文件。经过 plugin 转换之后的结果大概为:
module.exports = {
  module: {
    rules: [
      {
        loader: "/node_modules/vue-loader/lib/loaders/pitcher.js",
        resourceQuery: () => {},
        options: {},
      },
      {
        resource: () => {},
        resourceQuery: () => {},
        use: [
          {
            loader: "/node_modules/mini-css-extract-plugin/dist/loader.js",
          },
          { loader: "css-loader" },
        ],
      },
      {
        resource: () => {},
        resourceQuery: () => {},
        exclude: /node_modules/,
        use: [
          {
            loader: "babel-loader",
            options: {
              presets: [["@babel/preset-env", { targets: "defaults" }]],
            },
            ident: "clonedRuleSet-2[0].rules[0].use",
          },
        ],
      },
      {
        test: /\.vue$/i,
        use: [
          { loader: "vue-loader", options: {}, ident: "vue-loader-options" },
        ],
      },
      {
        test: /\.css$/i,
        use: [
          {
            loader: "/node_modules/mini-css-extract-plugin/dist/loader.js",
          },
          { loader: "css-loader" },
        ],
      },
      {
        test: /\.vue$/i,
        exclude: /node_modules/,
        use: [
          {
            loader: "babel-loader",
            options: {
              presets: [["@babel/preset-env", { targets: "defaults" }]],
            },
            ident: "clonedRuleSet-2[0].rules[0].use",
          },
        ],
      },
    ],
  },
};
2
3
4
5
6
7
8
9
10
11
12
13
14
15
16
17
18
19
20
21
22
23
24
25
26
27
28
29
30
31
32
33
34
35
36
37
38
39
40
41
42
43
44
45
46
47
48
49
50
51
52
53
54
55
56
57
58
59
60
61
62
63
转换之后生成6个rule,按定义的顺序分别为:
- 针对
xx.vue&vue格式路径生效的规则,只用了vue-loader的 Pitch 作为 Loader; - 被复制的 CSS 处理规则,
use数组与开发者定义的规则相同; - 被复制的 JS 处理规则,
use数组也跟开发者定义的规则相同; - 开发者定义的
vue-loader规则,内容及配置都不变; - 开发者定义的css规则,用到
css-loader、mini-css-extract-plugin loader; - 开发者定义的js规则,用到
babel-loader。
可以看到,第2、3项是从开发者提供的配置中复制过来的,内容相似,只是 cloneRule 在复制过程会给这些规则重新定义 resourceQuery 函数:
function cloneRule (rawRule, refs) {
    const rules = ruleSetCompiler.compileRules(`clonedRuleSet-${++uid}`, [{
      rules: [rawRule]
    }], refs)

    const conditions = rules[0].rules
      .map(rule => rule.conditions)
      // shallow flat
      .reduce((prev, next) => prev.concat(next), [])

    // ...

    const res = Object.assign({}, rawRule, {
      resource: resources => {
        currentResource = resources
        return true
      },
      resourceQuery: query => {
        if (!query) { return false }
        const parsed = qs.parse(query.slice(1))
        if (parsed.vue == null) {
          return false
        }
        if (!conditions) {
          return false
        }
        // 用import路径的lang参数测试是否适用于当前rule
        const fakeResourcePath = `${currentResource}.${parsed.lang}`
        for (const condition of conditions) {
          // add support for resourceQuery
          const request = condition.property === 'resourceQuery' ? query : fakeResourcePath
          if (condition && !condition.fn(request)) {
            return false
          }
        }
        return true
      }
    })
    // ...

    return res
  }
2
3
4
5
6
7
8
9
10
11
12
13
14
15
16
17
18
19
20
21
22
23
24
25
26
27
28
29
30
31
32
33
34
35
36
37
38
39
40
41
42
cloneRule 内部定义的 resourceQuery 函数对应 module.rules.resourceQuery (opens new window) 配置项,与我们经常用的 test 差不多,都用于判断资源路径是否适用这个rule。这里 resourceQuery 核心逻辑就是取出路径中的lang参数,伪造一个以 lang 结尾的路径,传入rule的condition中测试路径名对该rule是否生效,例如下面这种会命中 /\.js$/i 规则:
import script from "./index.vue?vue&type=script&lang=js&"
vue-loader 正是基于这一规则,为不同内容块 (css/js/template) 匹配、复用用户所提供的 rule 设置。
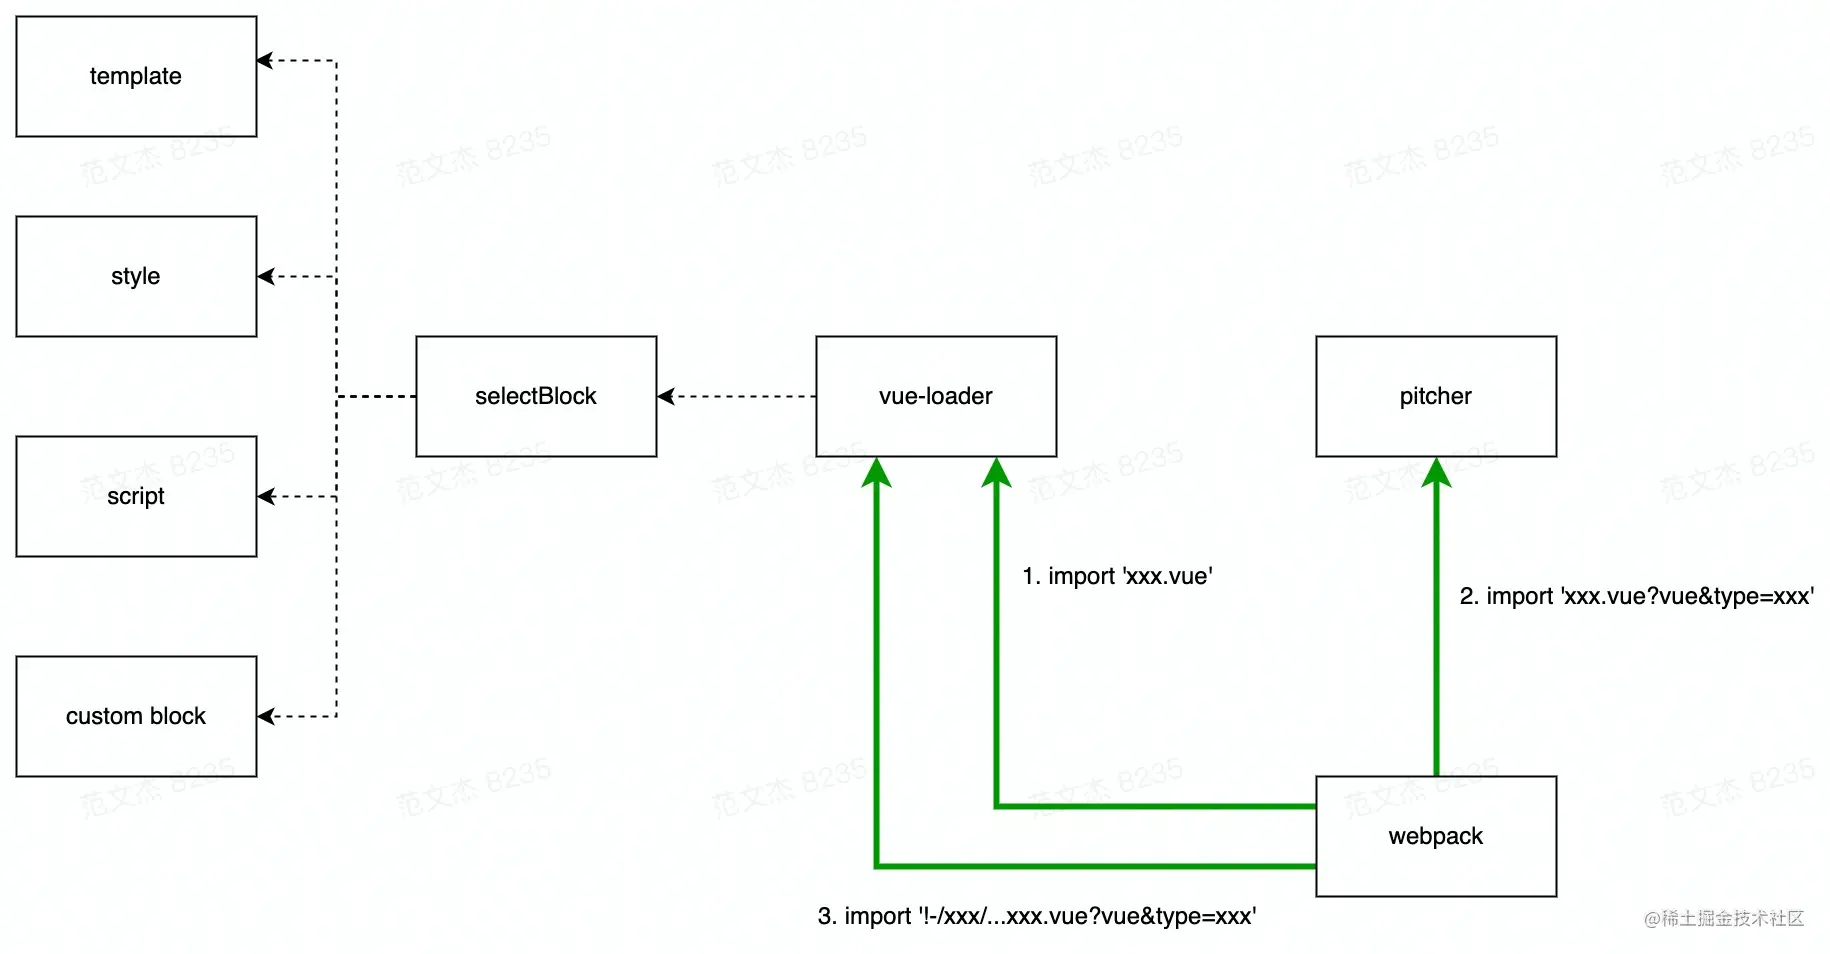
# 内容处理阶段
插件处理完配置,webpack 运行起来之后,Vue SFC 文件会被多次传入不同的 Loader,经历多次中间形态变换之后才产出最终的 js 结果,大致上可以分为如下步骤:
- 路径命中
/\.vue$/i规则,调用vue-loader生成中间结果 A; - 结果 A 命中
xx.vue?vue规则,调用vue-loaderPitch Loader 生成中间结果 B; - 结果 B 命中具体 Loader,直接调用 Loader 做处理。
过程大致为:
举个转换过程的例子:
// 原始代码
import xx from './index.vue';
// 第一步,命中 vue-loader,转换为:
import { render, staticRenderFns } from "./index.vue?vue&type=template&id=2964abc9&scoped=true&"
import script from "./index.vue?vue&type=script&lang=js&"
export * from "./index.vue?vue&type=script&lang=js&"
import style0 from "./index.vue?vue&type=style&index=0&id=2964abc9&scoped=true&lang=css&"

// 第二步,命中 pitcher,转换为:
export * from "-!../../node_modules/vue-loader/lib/loaders/templateLoader.js??vue-loader-options!../../node_modules/vue-loader/lib/index.js??vue-loader-options!./index.vue?vue&type=template&id=2964abc9&scoped=true&"
import mod from "-!../../node_modules/babel-loader/lib/index.js??clonedRuleSet-2[0].rules[0].use!../../node_modules/vue-loader/lib/index.js??vue-loader-options!./index.vue?vue&type=script&lang=js&";
export default mod; export * from "-!../../node_modules/babel-loader/lib/index.js??clonedRuleSet-2[0].rules[0].use!../../node_modules/vue-loader/lib/index.js??vue-loader-options!./index.vue?vue&type=script&lang=js&"
export * from "-!../../node_modules/mini-css-extract-plugin/dist/loader.js!../../node_modules/css-loader/dist/cjs.js!../../node_modules/vue-loader/lib/loaders/stylePostLoader.js!../../node_modules/vue-loader/lib/index.js??vue-loader-options!./index.vue?vue&type=style&index=0&id=2964abc9&scoped=true&lang=css&"

// 第三步,根据行内路径规则按序调用loader
2
3
4
5
6
7
8
9
10
11
12
13
14
15
每一步的细节,请继续往下看。
# 第一次执行 vue-loader
在运行阶段,根据配置规则, Webpack 首先将原始的 SFC 内容传入 vue-loader,例如对于下面的代码:
// main.js
import xx from 'index.vue';

// index.vue 代码
<template>
  <div class="root">hello world</div>
</template>

<script>
export default {
  data() {},
  mounted() {
    console.log("hello world");
  },
};
</script>

<style scoped>
.root {
  font-size: 12px;
}
</style>
2
3
4
5
6
7
8
9
10
11
12
13
14
15
16
17
18
19
20
21
22
此时第一次执行 vue-loader ,执行如下逻辑:
- 调用
@vue/component-compiler-utils包的parse函数,将SFC 文本解析为AST对象; - 遍历 AST 对象属性,转换为特殊的引用路径;
- 返回转换结果。
对于上述 index.vue 内容,转换结果为:
import { render, staticRenderFns } from "./index.vue?vue&type=template&id=2964abc9&scoped=true&"
import script from "./index.vue?vue&type=script&lang=js&"
export * from "./index.vue?vue&type=script&lang=js&"
import style0 from "./index.vue?vue&type=style&index=0&id=2964abc9&scoped=true&lang=css&"


/* normalize component */
import normalizer from "!../../node_modules/vue-loader/lib/runtime/componentNormalizer.js"
var component = normalizer(
  script,
  render,
  staticRenderFns,
  false,
  null,
  "2964abc9",
  null

)

...
export default component.exports
2
3
4
5
6
7
8
9
10
11
12
13
14
15
16
17
18
19
20
21
注意,这里并没有真的处理 block 里面的内容,而是简单地针对不同类型的内容块生成 import 语句:
- Script:
"./index.vue?vue&type=script&lang=js&" - Template:
"./index.vue?vue&type=template&id=2964abc9&scoped=true&" - Style:
"./index.vue?vue&type=style&index=0&id=2964abc9&scoped=true&lang=css&"
这些路径都对应原始的 .vue 路径基础上增加了 vue 标志符及 type、lang 等参数。
# 执行 Pitch Loader
如前所述,vue-loader 插件会在预处理阶段插入带 resourceQuery 函数的 Pitch Loader:
const pitcher = {
  loader: require.resolve('./loaders/pitcher'),
  resourceQuery: query => {
    if (!query) { return false }
    const parsed = qs.parse(query.slice(1))
    return parsed.vue != null
  }
}
2
3
4
5
6
7
8
其中, resourceQuery 函数命中 xx.vue?vue 格式的路径,也就是说上面 vue-loader 转换后的 import 路径会被 Pitch Loader 命中,做进一步处理。Pitch Loader 的逻辑比较简单,做的事情也只是转换 import 路径:
const qs = require('querystring')
...

const dedupeESLintLoader = loaders => {...}

const shouldIgnoreCustomBlock = loaders => {...}

// 正常的loader阶段,直接返回结果
module.exports = code => code

module.exports.pitch = function (remainingRequest) {
  const options = loaderUtils.getOptions(this)
  const { cacheDirectory, cacheIdentifier } = options
  // 关注点1: 通过解析 resourceQuery 获取loader参数
  const query = qs.parse(this.resourceQuery.slice(1))

  let loaders = this.loaders

  // if this is a language block request, eslint-loader may get matched
  // multiple times
  if (query.type) {
    // if this is an inline block, since the whole file itself is being linted,
    // remove eslint-loader to avoid duplicate linting.
    if (/\.vue$/.test(this.resourcePath)) {
      loaders = loaders.filter(l => !isESLintLoader(l))
    } else {
      // This is a src import. Just make sure there's not more than 1 instance
      // of eslint present.
      loaders = dedupeESLintLoader(loaders)
    }
  }

  // remove self
  loaders = loaders.filter(isPitcher)

  // do not inject if user uses null-loader to void the type (#1239)
  if (loaders.some(isNullLoader)) {
    return
  }

  const genRequest = loaders => {
    ...
  }

  // Inject style-post-loader before css-loader for scoped CSS and trimming
  if (query.type === `style`) {
    const cssLoaderIndex = loaders.findIndex(isCSSLoader)
    if (cssLoaderIndex > -1) {
      ...
      return query.module
        ? `export { default } from  ${request}; export * from ${request}`
        : `export * from ${request}`
    }
  }

  // for templates: inject the template compiler & optional cache
  if (query.type === `template`) {
    ...
    // console.log(request)
    // the template compiler uses esm exports
    return `export * from ${request}`
  }

  // if a custom block has no other matching loader other than vue-loader itself
  // or cache-loader, we should ignore it
  if (query.type === `custom` && shouldIgnoreCustomBlock(loaders)) {
    return ``
  }

  const request = genRequest(loaders)
  return `import mod from ${request}; export default mod; export * from ${request}`
}
2
3
4
5
6
7
8
9
10
11
12
13
14
15
16
17
18
19
20
21
22
23
24
25
26
27
28
29
30
31
32
33
34
35
36
37
38
39
40
41
42
43
44
45
46
47
48
49
50
51
52
53
54
55
56
57
58
59
60
61
62
63
64
65
66
67
68
69
70
71
72
核心功能是遍历用户定义的rule数组,拼接出完整的行内引用路径,例如:
// 开发代码:
import xx from 'index.vue'
// 第一步,通过vue-loader转换成带参数的路径
import script from "./index.vue?vue&type=script&lang=js&"
// 第二步,在 pitcher 中解读loader数组的配置,并将路径转换成完整的行内路径格式
import mod from "-!../../node_modules/babel-loader/lib/index.js??clonedRuleSet-2[0].rules[0].use!../../node_modules/vue-loader/lib/index.js??vue-loader-options!./index.vue?vue&type=script&lang=js&";
2
3
4
5
6
# 第二次执行 vue-loader
通过上面 vue-loader -> Pitch Loader 处理后,会得到一个新的行内路径,例如:
import mod from "-!../../node_modules/babel-loader/lib/index.js??clonedRuleSet-2[0].rules[0].use!../../node_modules/vue-loader/lib/index.js??vue-loader-options!./index.vue?vue&type=script&lang=js&";
以这个 import 语句为例,之后 Webpack 会按照下述逻辑运行:
- 调用
vue-loader处理index.js文件; - 调用
babel-loader处理上一步返回的内容。
这就给了 vue-loader 第二次执行的机会,再回过头来看看 vue-loader 的代码:
module.exports = function (source) {
  // ...

  const {
    target,
    request,
    minimize,
    sourceMap,
    rootContext,
    resourcePath,
    resourceQuery = "",
  } = loaderContext;
  // ...

  const descriptor = parse({
    source,
    compiler: options.compiler || loadTemplateCompiler(loaderContext),
    filename,
    sourceRoot,
    needMap: sourceMap,
  });

  // if the query has a type field, this is a language block request
  // e.g. foo.vue?type=template&id=xxxxx
  // and we will return early
  if (incomingQuery.type) {
    return selectBlock(
      descriptor,
      loaderContext,
      incomingQuery,
      !!options.appendExtension
    );
  }
  //...
  return code;
};

module.exports.VueLoaderPlugin = plugin;
2
3
4
5
6
7
8
9
10
11
12
13
14
15
16
17
18
19
20
21
22
23
24
25
26
27
28
29
30
31
32
33
34
35
36
37
38
第二次运行时由于路径已经带上了 type 参数,会命中上面第26行的判断语句,进入 selectBlock 函数,这个函数的逻辑很简单:
module.exports = function selectBlock (
  descriptor,
  loaderContext,
  query,
  appendExtension
) {
  // template
  if (query.type === `template`) {
    if (appendExtension) {
      loaderContext.resourcePath += '.' + (descriptor.template.lang || 'html')
    }
    loaderContext.callback(
      null,
      descriptor.template.content,
      descriptor.template.map
    )
    return
  }

  // script
  if (query.type === `script`) {
    if (appendExtension) {
      loaderContext.resourcePath += '.' + (descriptor.script.lang || 'js')
    }
    loaderContext.callback(
      null,
      descriptor.script.content,
      descriptor.script.map
    )
    return
  }

  // styles
  if (query.type === `style` && query.index != null) {
    const style = descriptor.styles[query.index]
    if (appendExtension) {
      loaderContext.resourcePath += '.' + (style.lang || 'css')
    }
    loaderContext.callback(
      null,
      style.content,
      style.map
    )
    return
  }

  // custom
  if (query.type === 'custom' && query.index != null) {
    const block = descriptor.customBlocks[query.index]
    loaderContext.callback(
      null,
      block.content,
      block.map
    )
    return
  }
}
2
3
4
5
6
7
8
9
10
11
12
13
14
15
16
17
18
19
20
21
22
23
24
25
26
27
28
29
30
31
32
33
34
35
36
37
38
39
40
41
42
43
44
45
46
47
48
49
50
51
52
53
54
55
56
57
至此,就可以完成从 Vue SFC 文件中抽取特定 Block 内容,并复用用户定义的其它 Loader 加载这些 Block。
综上,我们可以将 vue-loader 的核心逻辑总结为:
- 首先给原始文件路径增加不同的参数,后续配合
resourceQuery参数就可以分开处理这些内容,这样的实现相比于一次性处理,逻辑更清晰简洁,更容易理解; - 经过 Normal Loader、Pitch Loader 两个阶段后,SFC 内容会被转化为
import xxx from '!-babel-loader!vue-loader?xxx'格式的引用路径,以此复用用户配置。
# 手写 babel-loader
babel-loader (opens new window) 做的事情其实很简单,只需将 Loader 中的源代码交给 babel 库处理 (opens new window),拿到处理过后的值返回,仅此而已。
const babel = require("@babel/core");
const path = require("path");

function babelLoader(source) {
  // loade里面的 this=loaderContext,是一个唯一的对象,
  // 不管在哪个loader或方法里,它的this都是同一个对象,称为loaderContext,这个等会就会实现
  // 拿到在webpack中传递给该loader的参数,也就是presets: ["@babel/preset-env"]
  const options = this.getOptions();
  console.log("自己写的babel-loader");
  const { code } = babel.transformSync(source, options); //交给babel库去解析
  return code;
}

module.exports = babelLoader;
2
3
4
5
6
7
8
9
10
11
12
13
14
15
# 小结
- Loader 主要负责将资源内容转译为 Webpack 能够理解、处理的标准 JavaScript 形式,所以通常需要做 Loader 内通过
return/this.callback方式返回翻译结果; - Loader Context 提供了许多实用接口,我们可以借助这些接口读取上下文信息,或改变 Webpack 运行状态(相当于产生 Side Effect,例如通过
emitFile接口); - 假若我们开发的 Loader 需要对外提供配置选项,建议使用
schema-utils校验配置参数是否合法; - 假若 Loader 需要生成额外的资源文件,建议使用
loader-utils拼接产物路径; - 执行时,Webpack 会按照
use定义的顺序从前到后执行 Pitch Loader,从后到前执行 Normal Loader,我们可以将一些预处理逻辑放在 Pitch 中(如vue-loader);